Configure Ezeelogin on AWS RDS
Configure Ezeelogin on AWS - RDS Remote Database.
How do you configure Ezeelogin to use SSL for AWS RDS? Refer to this article.
Overview: This article describes how a user can set up Ezeelogin on AWS as an RDS Remote database in primary/master as well as secondary/slave nodes.
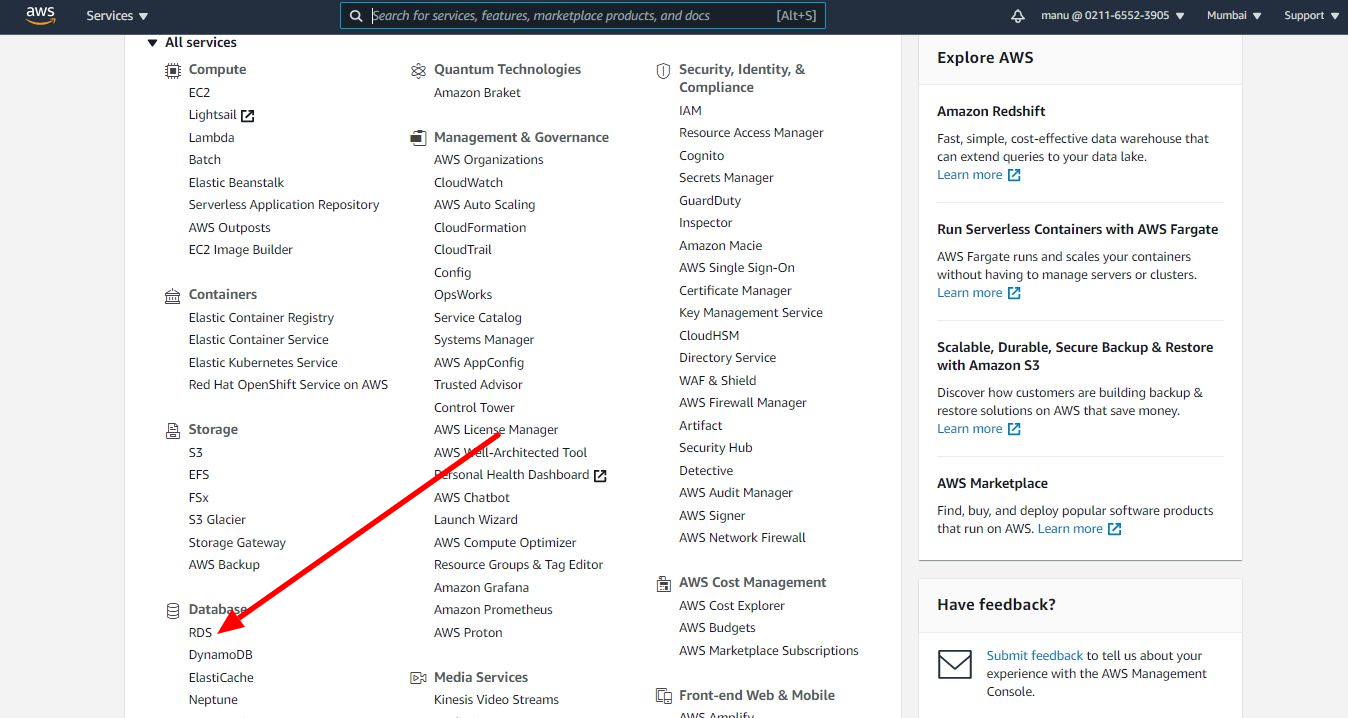
1. Setting up the RDS environment
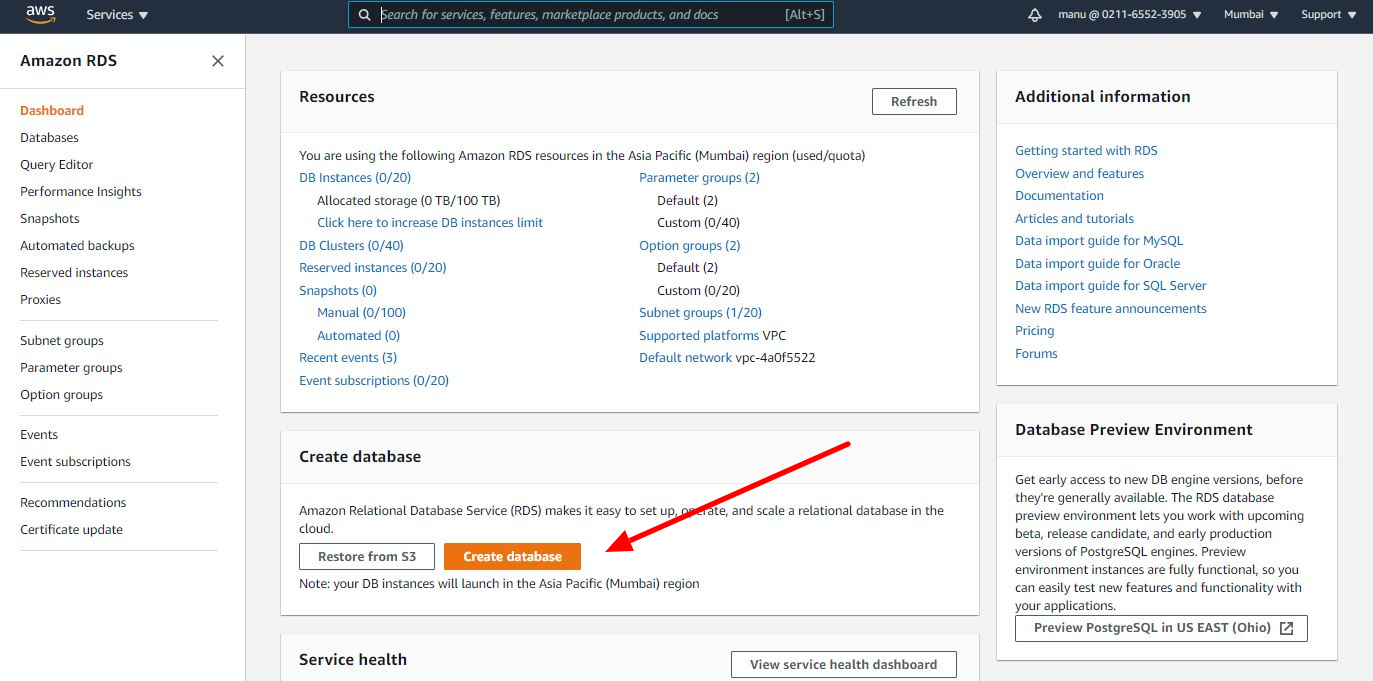
Login to AWS account > Open the RDS and proceed to create the RDS MySQL Environment. On the next page that appears, click on Create Database. This will open another page where you can define the necessary details required to set up the MySQL Database.
2. Creating the MySQL database
a. Click on the Create Database, and a new page opens as follows, where you can define the database creation method and other options. Select Standard Create as the database creation method. Select the Engine Type as MySQL/MariaDB and the version (check the software requirements on the article that Ezeelogin supports)
a. Select the Engine Type as MySQL/MariaDB and select the version. Here I have selected MariaDB 10.2, you can select the Ezeelogin-supported engine type & version.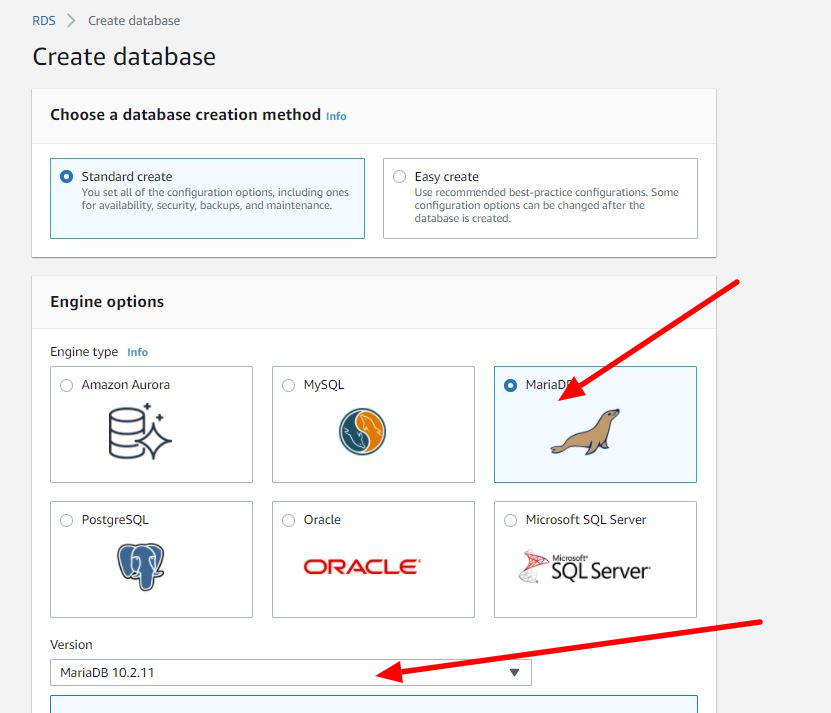
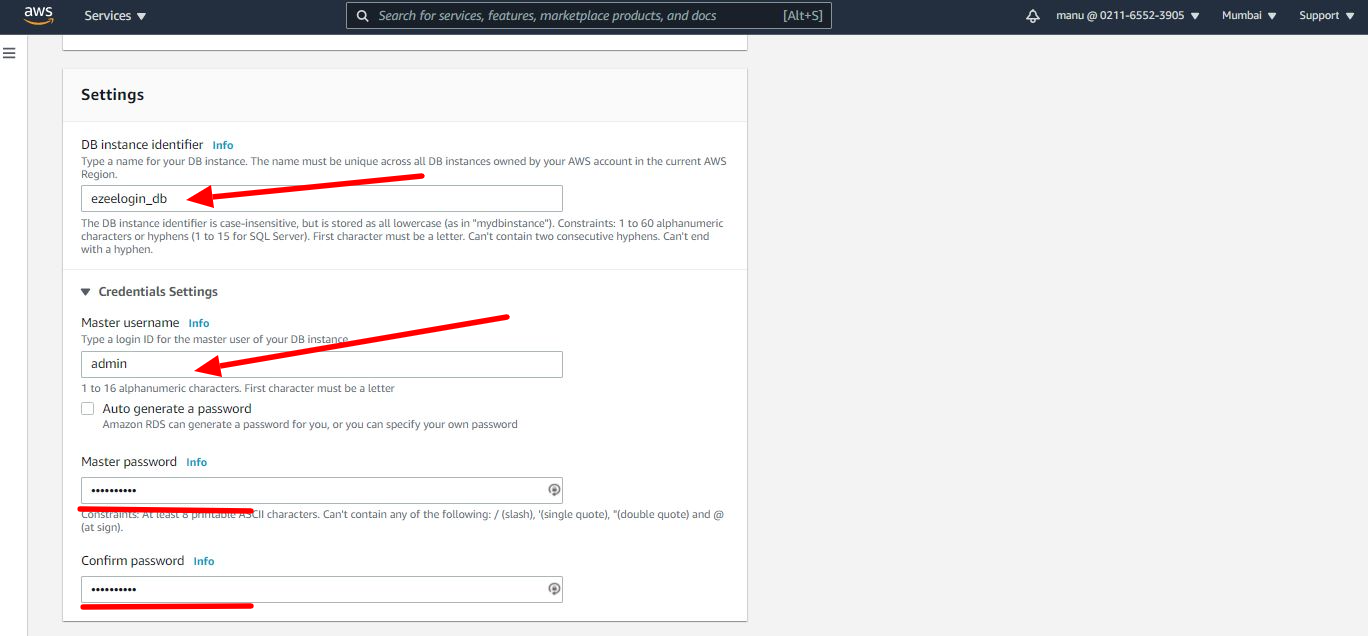
b. In the next step, Provide a suitable name for the database instance, for example, I’m going to use the database instance as “ezeelogin_db”. Similarly, provide a suitable master username and password for the same. This is the username and the password, that you will be using later to connect to this MySQL instance later. Also, you must keep these credentials safe so that they can be used later again.
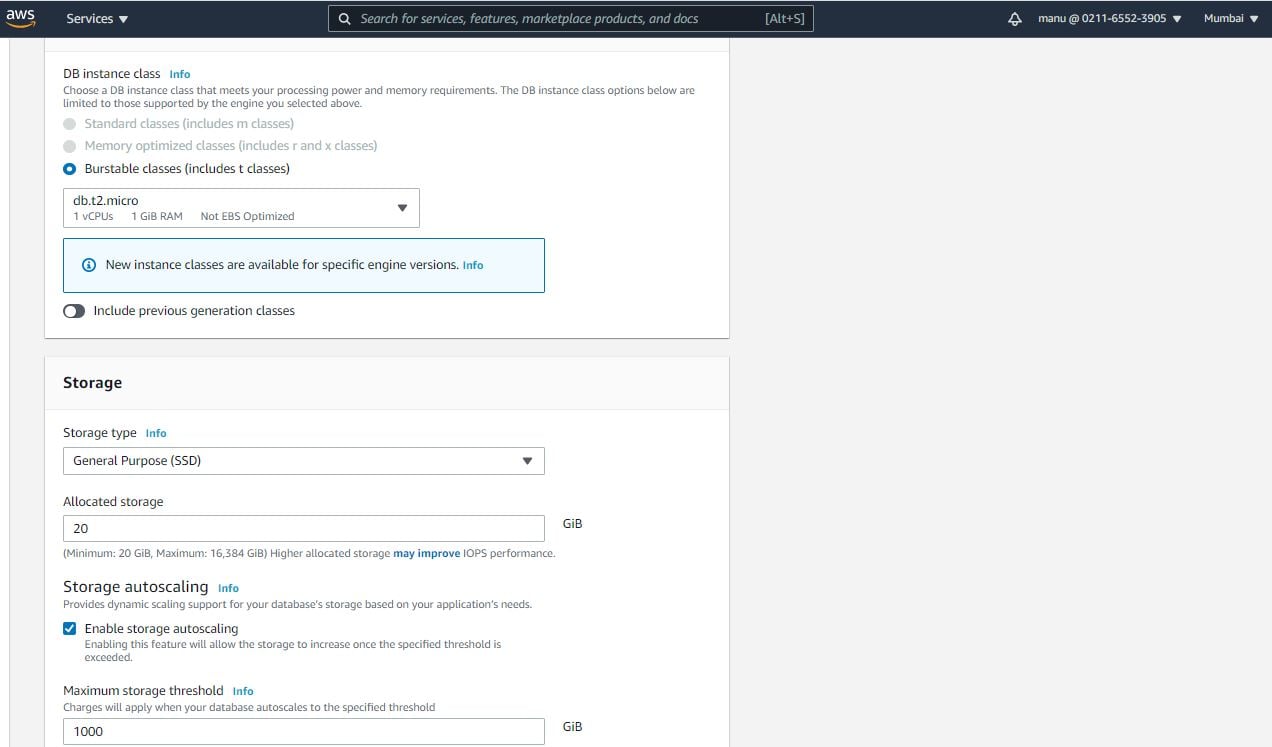
c. Now, we need to set some other properties that are essential to set up the RDS MySQL Environment. Select the Database Instance Size as “db.t2.micro” and the Storage Type as General Purpose SSD. By default, the memory size is allocated to 20GB which is fine for the moment.
d. You should allow connections from the public network to allow and connect to the instance. 
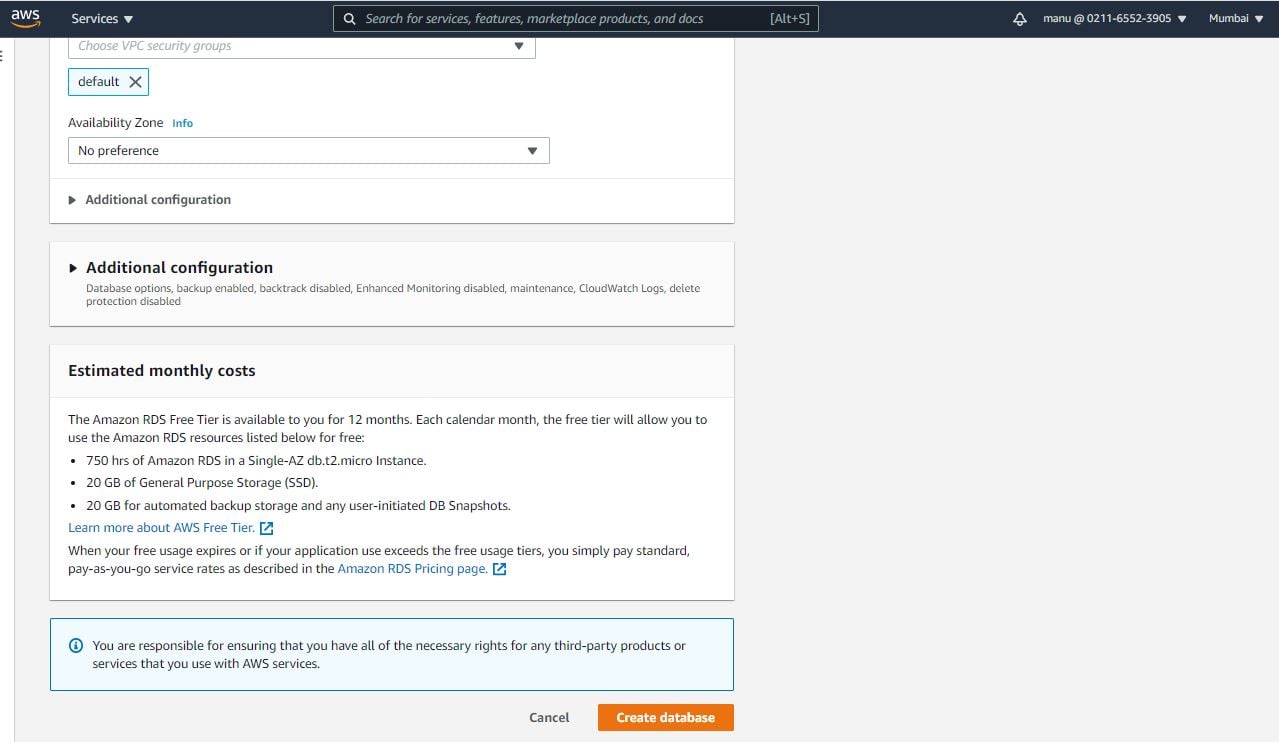
e. we should define the Connectivity settings for the RDS Database instance. Select the default VPC connection that is already available within your login. Since we will be accessing the database instance from outside the AWS Environment, we should enable the Publicly Accessible to Yes. The final step in creating the database is to select the Database Authentication Mode as Password Authentication. Once completed, click on Create Database.
- Once you click on Create Database in the previous step, it might take a while for AWS to create the RDS instance and make it available for use. After a few moments, you will receive a notification that says the database has been created successfully. Click on the DB Identifier for the MySQL Database. A new page will open containing more information about the MySQL database instance. The important thing to note here is the Endpoint that is available. This endpoint information will be used later to connect to the Ezeelogin.
3. You can now use the RDS MySQL instance to install Ezeelogin
a. Follow the jumpserver install article and start the Ezeelogin installation
b. Follow the prompts and you should give the AWS RDS connection details on the prompt as follows.
Using the remote database server for the Ezeelogin database
Enter the hostname/IP address of the remote database server or use localhost, if you are going to run the database server on the current server.
- Enter the endpoint that we copied in the previous steps as the hostname and the master username as the username here.
- Provide the RDS master username and password here.
c. You can continue with the prompt and complete the Ezeelogin installation.
Note:
If you are getting the following error after installation "ERROR granting access for DB user: Access denied for user 'root'@'%' to database 'ezlogin_jzgzs' ", run the following command to grant privileges manually. This error usually pops up while using remote MySQL database/ RDS connections.
Login to MySQL as root or admin user & replace with your Ezeelogin database credentials. Ezeelogin database credentials such as dbname, dbusername & dbpassword will be displayed on the installation screen[reviewsettings] or you can refer to the article to retrieve Ezeelogin database credentials.
root@gateway:~# mysql -u root -p
mysql> grant all on ezeelogin_dbname.* to 'ezlogin_dbusername'@'%' identified by 'ezeelogin_dbusername_password' ;
mysql> flush privileges;
For Example: mysql> grant all on ezlogin_jzgzs.* to 'ezlogin_xynqwd'@'%' identified by '!T3}3w$czV$6VrWxG)kn{5&3t5'; ( Database credentials such as dbname, dbusername & dbpassword will displayed on installation screen[reviewsettings])
4. After Installation login to the AWS RDS database and grant connectivity to Ezeelogin server hostname/IP on the remote database server.
a. If you are choosing MySQL as your RDS
You can find out the Ezeelogin database name, and database password from the " Review settings " on the installation screen. Also, refer to the article to show the Ezeelogin database credentials.
root@primary :~# mysql -h ezeelogin_db.123456789012.us-east-1.rds.amazonaws.com -P 3306 -u mymasteruser -p
mysql> CREATE USER 'ezlogin_mysqldatabase_username'@'%' IDENTIFIED BY 'password';
mysql> GRANT ALL PRIVILEGES ON ezlogin_databasename.* TO 'ezlogin_mysqldatabase_username'@'%' WITH GRANT OPTION;
mysql> flush privileges;
For Example:
mysql> CREATE USER 'ezlogin_kbjt'@'%' IDENTIFIED BY ']5ZUnsb!a^^cs%';
mysql> GRANT ALL PRIVILEGES ON ezlogin_jmfug.* TO 'ezlogin_kbjt'@'%' WITH GRANT OPTION;
mysql> flush privileges;
b. If you are choosing MariaDB as your RDS
You can find out the Ezeelogin database name, and database password from the " Review settings " on the installation screen. Also, refer to the article to show the Ezeelogin database credentials.
root@primary :~# mysql -h ezeelogin_db.123456789012.us-east-1.rds.amazonaws.com -P 3306 -u mymasteruser -p
MariaDB [(none)]> GRANT ALL PRIVILEGES ON ezlogin_databasename.* TO 'ezlogin_mysqldatabase_username'@'%' IDENTIFIED BY 'password' WITH GRANT OPTION;
MariaDB [(none)]> flush privileges;
For Example:
MariaDB [(none)]> GRANT ALL PRIVILEGES ON ezlogin_jmfug.* TO 'ezlogin_kbjt'@'%' IDENTIFIED BY ']5ZUnsb!a^^cs%' WITH GRANT OPTION;
MariaDB [(none)]> flush privileges;
How to configure Ezeelogin on AWS - RDS Remote Database for Secondary?
Refer to steps 1 and 2 to create the AWS RDS database.
1. Execute the following command on the primary server to grant access to the Ezeelogin database from the secondary/slave node
root@primary ~]# php /usr/local/ezlogin/grant_host.php <ip_address of secondary node/slave>
2. You can now use the RDS MySQL instance to install secondary Ezeelogin.
a. Follow the secondary jump server install article and start the Ezeelogin installation
b. Follow the prompts and you should give the AWS RDS connection details on the prompt as follows.
Using the remote database server for the Ezeelogin database
Enter the hostname/IP address of the remote database server or use localhost, if you are going to run the database server on the current server.
- Enter the endpoint that we copied in the previous steps as the hostname and the master username as the username here.
- Provide the RDS master username and password
c. You can continue with the prompt and complete the Ezeelogin installation.
Note:
If you are getting the following error after installation "ERROR granting access for DB user: Access denied for user 'root'@'%' to database 'ezlogin_jzgzs' " , run the following command to grant privileges manually. This error usually pops up while using remote MySQL database/ RDS connections.
Login to MySQL as root or admin user & replace with your Ezeelogin database credentials. Ezeelogin database credentials such as dbname, dbusername & dbpassword will be displayed on the installation screen[reviewsettings] or you can refer to the article to retrieve Ezeelogin database credentials.
root@gateway:~# mysql -u root -p
mysql> grant all on ezeelogin_dbname.* to 'ezlogin_dbusername'@'%' identified by 'ezeelogin_dbusername_password' ;
mysql> flush privileges;
For Example: mysql> grant all on ezlogin_jzgzs.* to 'ezlogin_xynqwd'@'%' identified by '!T3}3w$czV$6VrWxG)kn{5&3t5'; ( Database credentials such as dbname, dbusername & dbpassword will displayed on installation screen[reviewsettings])
3. After Installation login to the AWS RDS database and grant connectivity to Ezeelogin server hostname/IP on the remote database server.
a. If you are choosing MySQL as your RDS
You can find out the Ezeelogin database name, and database password from the " Review settings " on the installation screen. Also, refer the article to show the Ezeelogin database credentials.
root@primary :~# mysql -h ezeelogin_db.123456789012.us-east-1.rds.amazonaws.com -P 3306 -u mymasteruser -p
mysql> CREATE USER 'ezlogin_mysqldatabase_username'@'%' IDENTIFIED BY 'password';
mysql> GRANT ALL PRIVILEGES ON ezlogin_databasename.* TO 'ezlogin_mysqldatabase_username'@'%' WITH GRANT OPTION;
mysql> flush privileges;
For Example:
mysql> CREATE USER 'ezlogin_kbjt'@'%' IDENTIFIED BY ']5ZUnsb!a^^cs%';
mysql> GRANT ALL PRIVILEGES ON ezlogin_jmfug.* TO 'ezlogin_kbjt'@'%' WITH GRANT OPTION;
mysql> flush privileges;
b. If you are choosing MariaDB as your RDS
You can find out the Ezeelogin database name, and database password from the " Review settings " on the installation screen. Also, refer the article to show the Ezeelogin database credentials.
root@primary :~# mysql -h ezeelogin_db.123456789012.us-east-1.rds.amazonaws.com -P 3306 -u mymasteruser -p
MariaDB [(none)]> GRANT ALL PRIVILEGES ON ezlogin_databasename.* TO 'ezlogin_mysqldatabase_username'@'%' IDENTIFIED BY 'password' WITH GRANT OPTION;
MariaDB [(none)]> flush privileges;
For Example:
MariaDB [(none)]> GRANT ALL PRIVILEGES ON ezlogin_jmfug.* TO 'ezlogin_kbjt'@'%' IDENTIFIED BY ']5ZUnsb!a^^cs%' WITH GRANT OPTION;
MariaDB [(none)]> flush privileges;
Note: Ezeelogin will support only MySQL version 5.6,5.7,8 and MariaDB 10.2 on RDS. Other MySQL, and MariaDB versions on RDS will not support Ezeelogin.
Related Articles:
Configure Jumpserver to use SSL for AWS RDS.