Add windows server for RDP via browser
How to add Windows server for one-click RDP access via web browser in Ezeelogin?
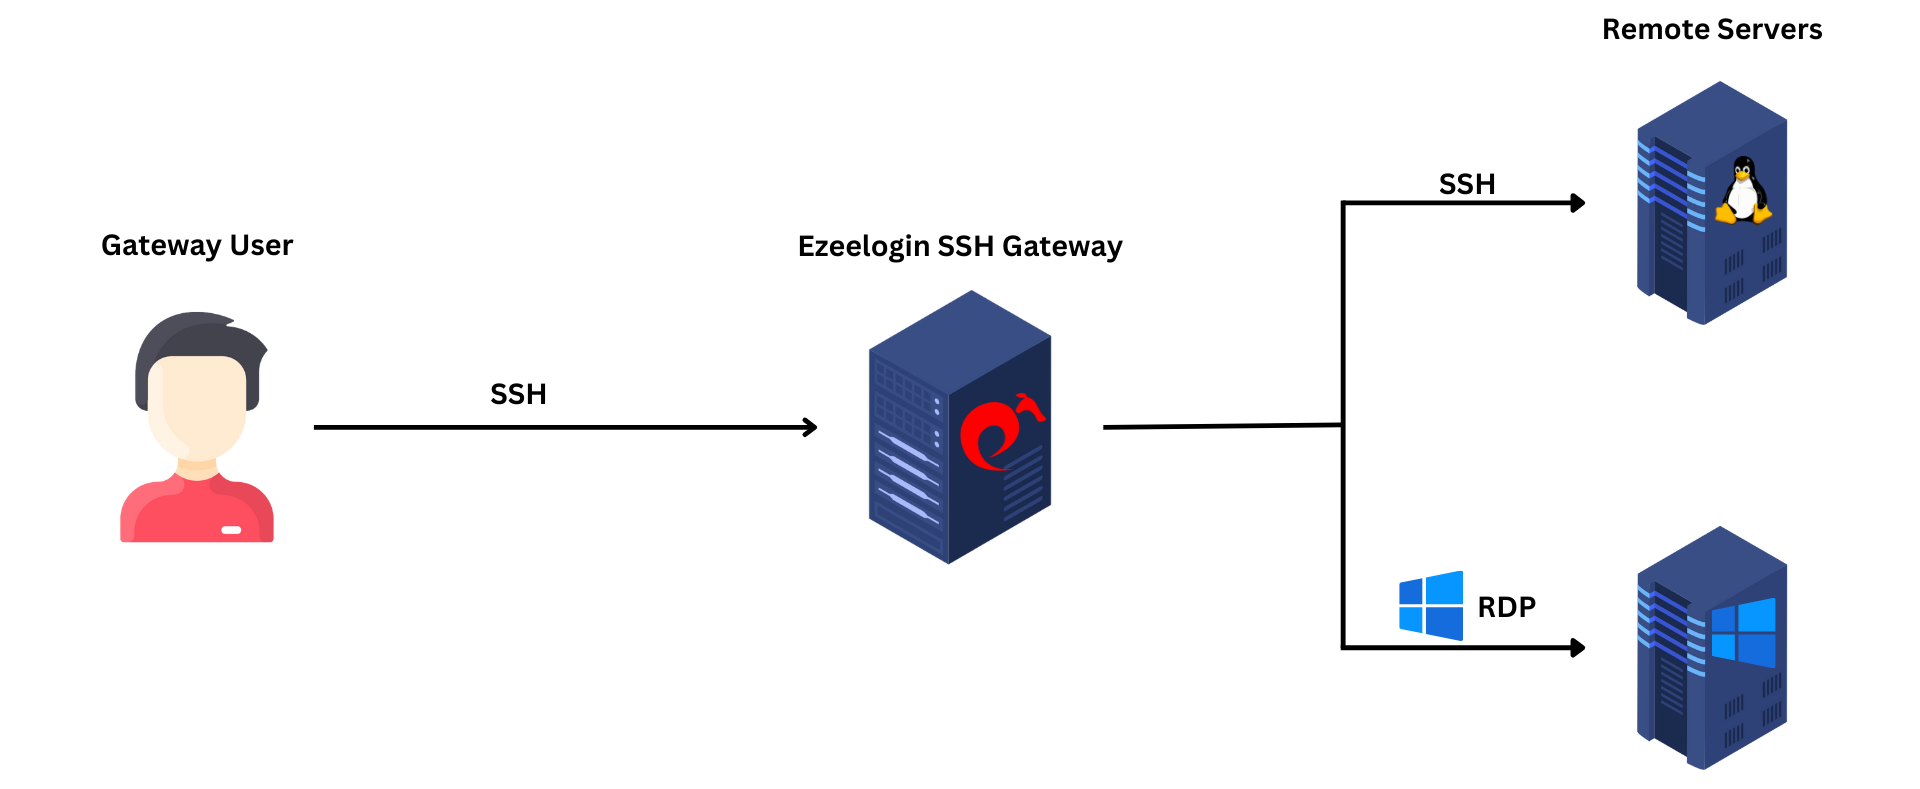
Overview: This article provides step-by-step instructions on how to add a Windows server for one-click RDP access for gateway users via a web browser from gateway server.
Ensure that the desktop browser has enough CPU( 2GHZ) and RAM( 2- 4 GB ). Close out browser tabs to reduce the CPU footprint so that the browser-based RDP works without slowness.
- Web RDP will work only if the web interface is accessed via HTTPS.
- RDP is still in beta. Some features like shared clipboard, audio redirection, etc. are not present.
- NLA is currently supported, and if the user is enabling it, the username and password should be saved when adding the RDP server to Ezeelogin.
- If the user is not enabling NLA, they can choose to either save the username and password in Ezeelogin or not, and both options will work.

1. On the gateway server install nodejs.
Step 1(A): On Centos 7
root@gateway:~# yum install epel-release
root@gateway:~# yum install npm
Step 1(B): On Ubuntu 16/18 and Debian 10
root@gateway:~# apt install npm
Step 1(C): On Ubuntu 20/22
root@gateway:~# apt-get update
root@gateway:~# apt install npm
2. Install n, Node’s version manager:
Step 2(A): If you are not using SSL, you need to set the repo to HTTP by running :
root@gateway:~# npm config set registry http://registry.npmjs.org/
root@gateway:~# npm install -g n
3. Install node:
Step 3(A): To install the latest version:
root@gateway:~# n latest
Step 3(B): To install the corresponding version :
root@gateway:~# n version.number
For example, the below command will install node 19
root@gateway:~# n 19

Step 3(C): Run the following command to install the node without SSL
root@gateway:~# n --insecure latest
Step 3(D): To switch between node versions run the following command and refer to the given screenshot.
root@gateway:~# n

4. Install NodeJS module dependencies
Step 4(A): Install the NodeJS module dependencies for the Web RDP Console application by running the following command.
root@gateway:~# php /usr/local/ezlogin/eztool.php -- -install_node_modules -node_component webrdp
OR
root@gateway:~# cd $(awk '/^system_folder/ {print $2}' /usr/local/etc/ezlogin/ez.conf)/application/external/mstsc/&& npm install
5. Update Settings
Step 5(A): The nodejs command field should have the path to the node or nodejs binary which usually is /usr/bin/node in the case of Centos7 and /usr/bin/nodejs in the case of Ubuntu 14-04. Run below commands to get the path to the node binary.
root@gateway:~# which node or which nodejs or whereis nodejs or whereis node
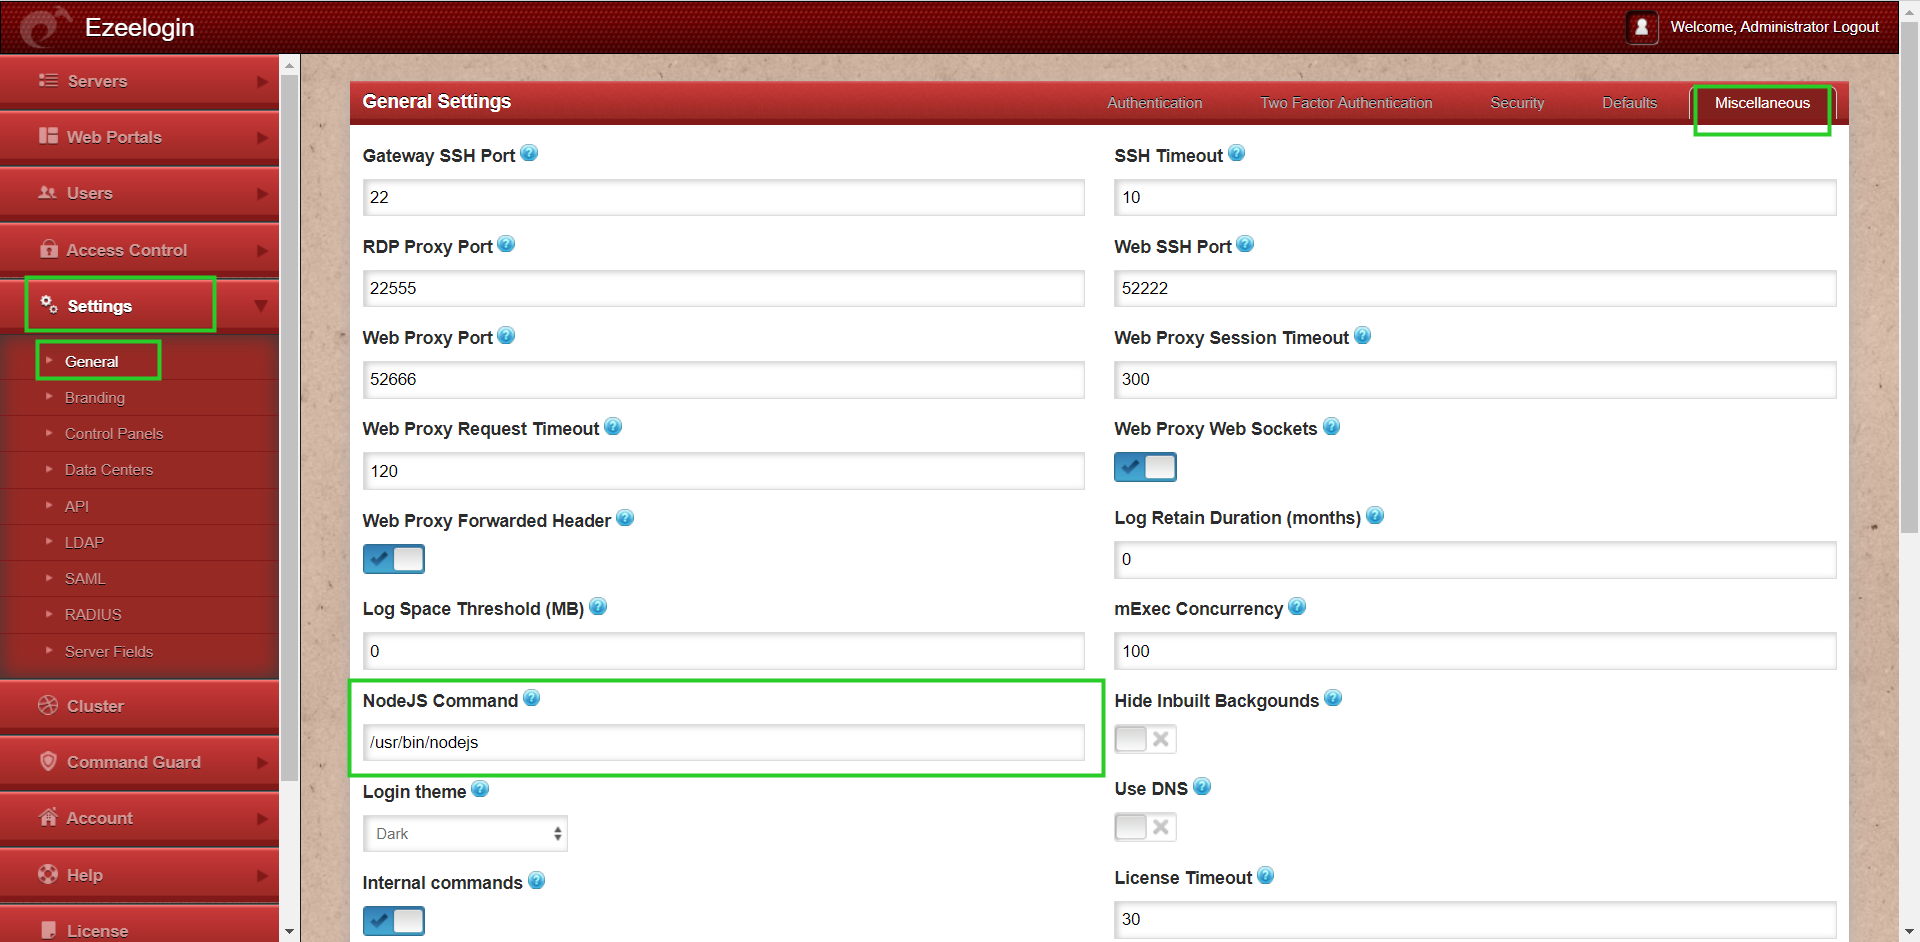
Step 5(B): Specify the path to the node binary correctly under Settings -> General -> Miscellaneous -> Nodejs Command.

Ensure that inbound TCP traffic on port 22555 is open as nodejs server listens on this port. ( you can confirm the port from Ezeelogin GUI > Settings > General > Miscellaneous > RDP Proxy Port)
Ensure that outbound TCP traffic on port 3389 is open as RDP listens on this port.
6. SSL for the browser.
Step 6(A): To ensure SSL for the browser tab that opens up for the web RDP, generate a self-signed cert with the following command. Web Shell will work only if the web interface is accessed via HTTPS
root@gateway:~# openssl req -new -days 365 -x509 -nodes -newkey rsa:2048 -out /usr/local/etc/ezlogin/tls_cert.pem -keyout /usr/local/etc/ezlogin/tls_key.pem
Make sure to install SSL (self-signed or a valid cert )even if you have installed an SSL certificate on the Load balancer (ELB/ALB).
Also, make sure to add a listener and routing for the port RDP Proxy Port 22555
Step 6(B): Or put a valid ca, cert, and key in the files: /usr/local/etc/ezlogin/tls_ca.pem, /usr/local/etc/ezlogin/tls_cert.pem & /usr/local/etc/ezlogin/tls_key.pem respectively. You can rename your current .crt / .key file to .pem file.
Also, make sure that the .pem files are readable by the webserver user such as nobody/www-root/apache, etc.
An easy way to grant the web user read privileges would be chmod 644 /usr/local/etc/ezlogin/*.pem
7. Add windows-server
Step 7(A): Add windows-servers by clicking the add button as shown below:

8. Enable RDP
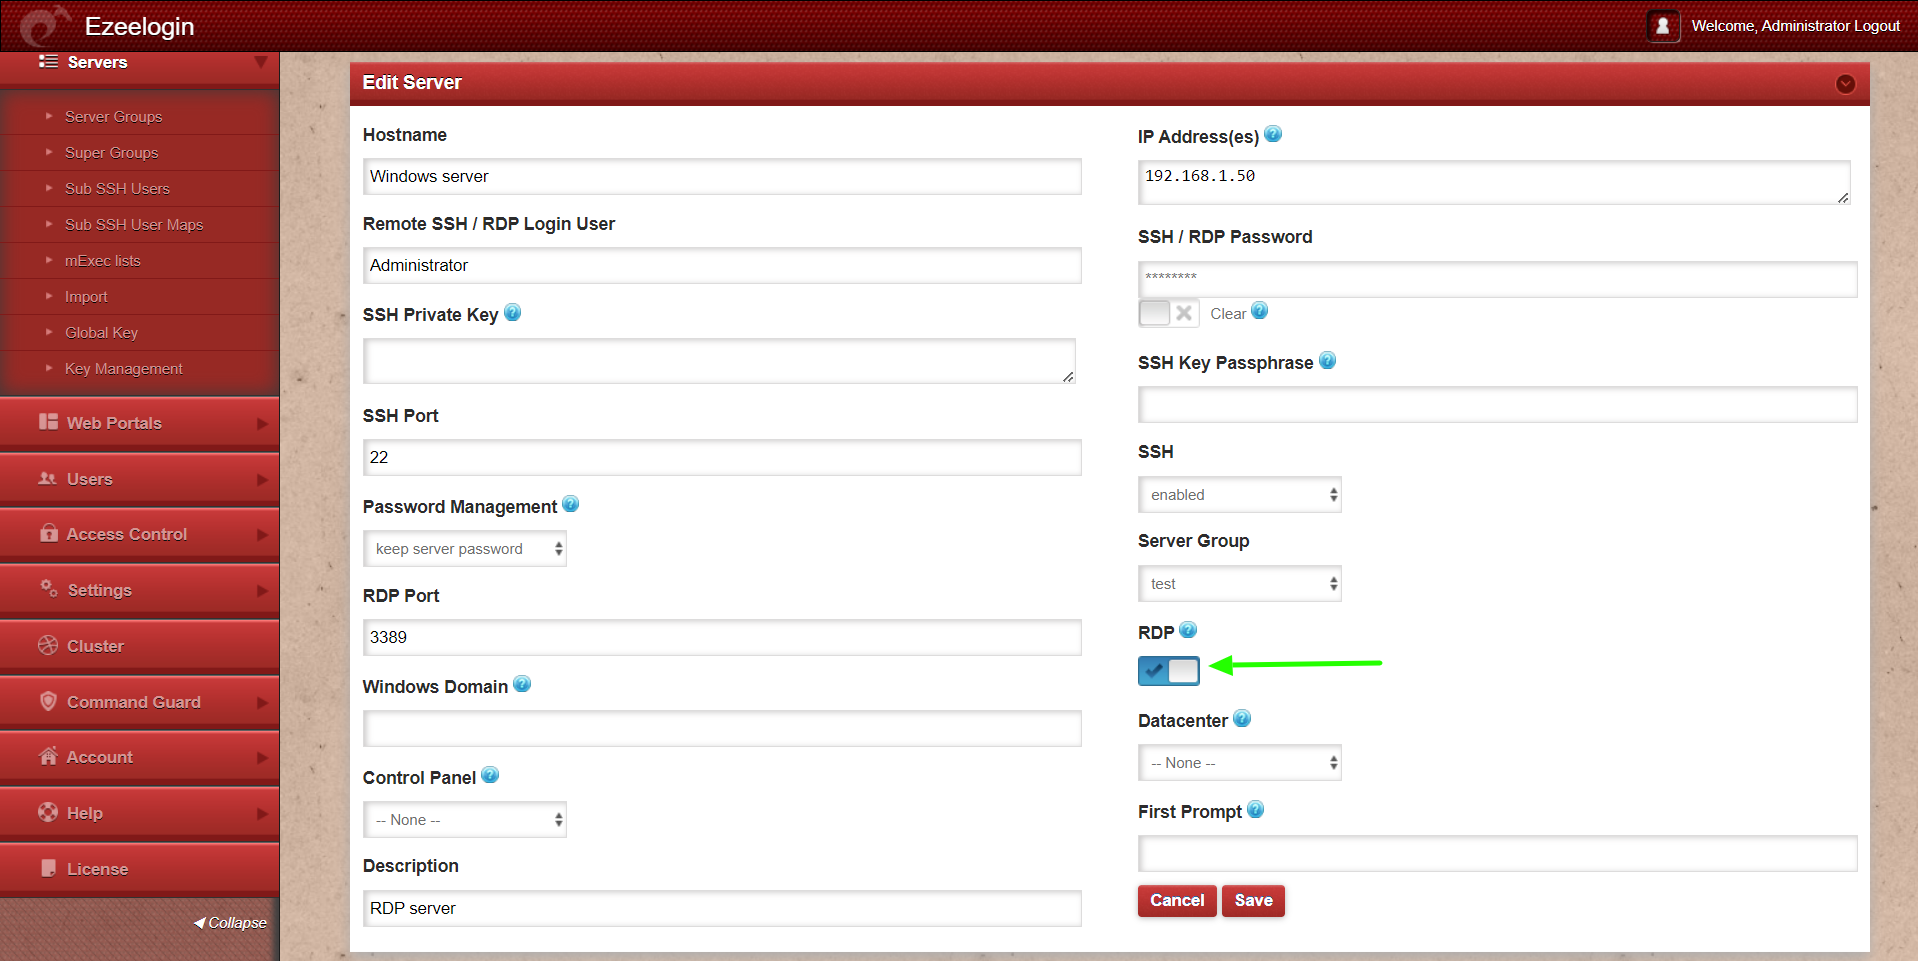
Step 8(A): Ensure that you have provided the correct username and password while adding windows server, when Network Level Authentication (NLA) is enforced on the remote Windows machine. Also, make sure that while adding a windows server you have enabled the RDP and mentioned the default RDP port number(3389).

9. Granting access
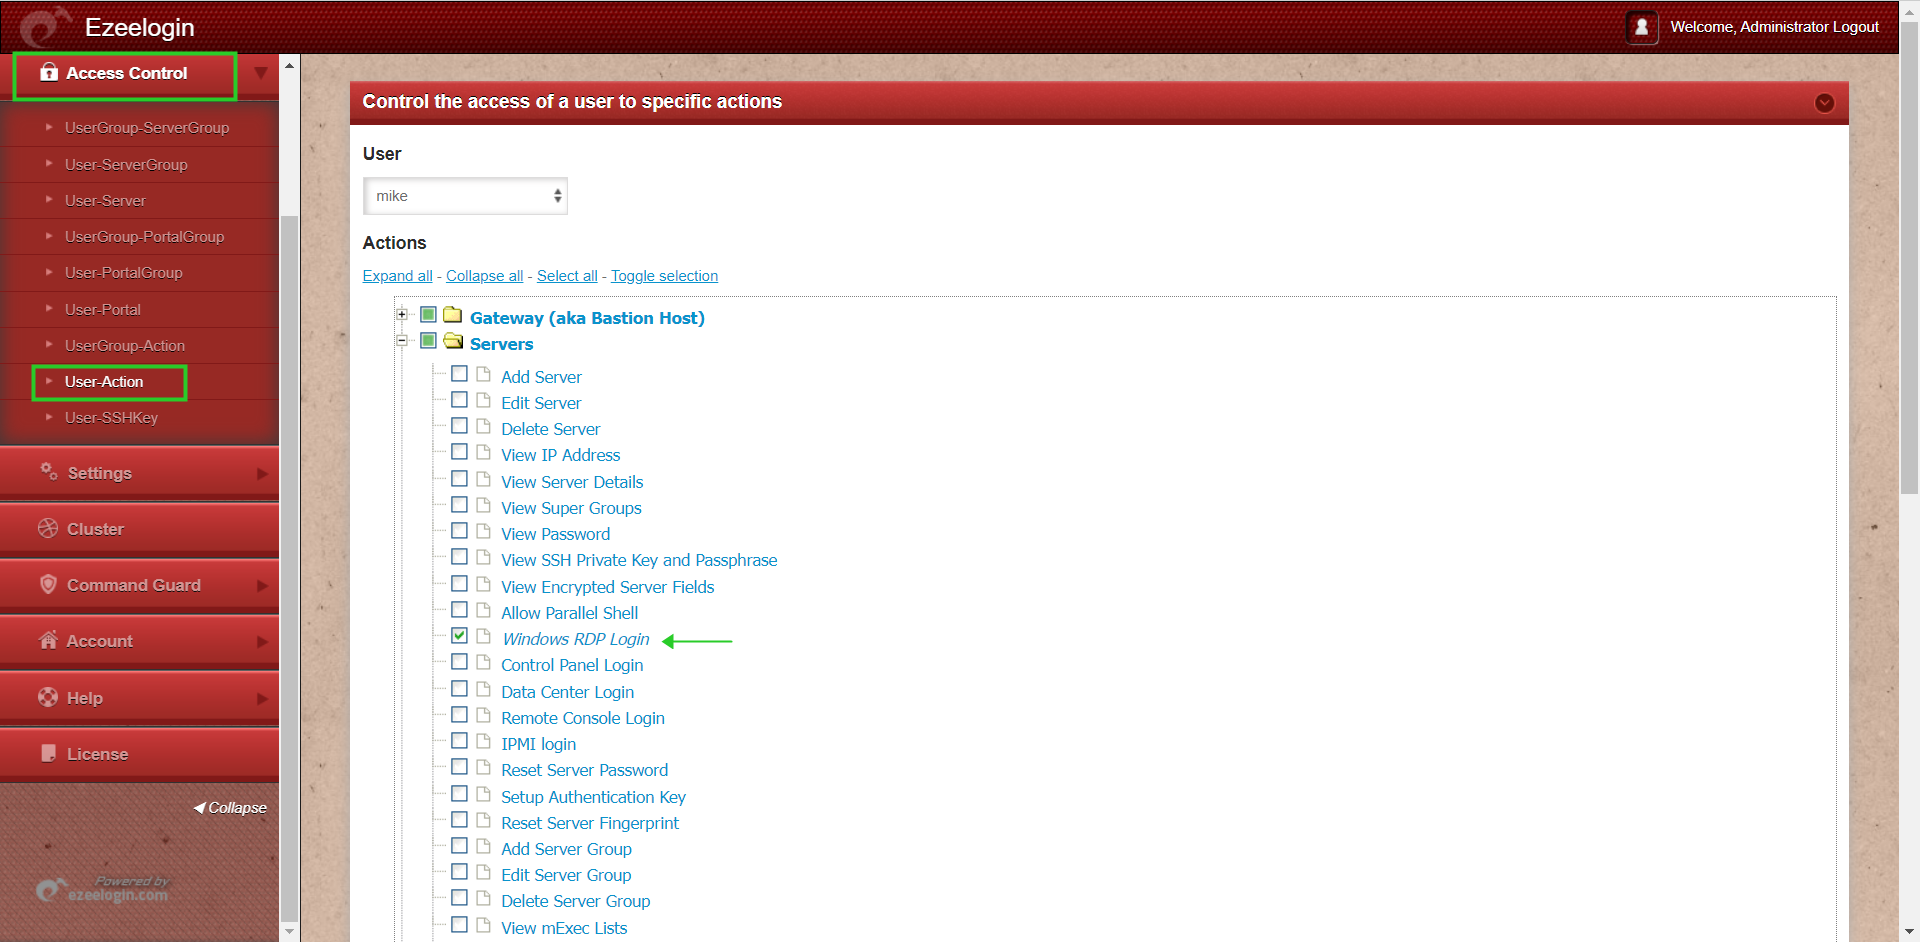
Step 9(A): Make sure that the users have the privilege to access ’ Windows RDP Login ’

10. Access Windows server.
Step 10(A): Click on the Windows icon to RDP into the remote machine

Pros of browser-based RDP
- Easily RDP via browser in one click
- Don't have to remember the administrator passwords
- No RDP client needed
Cons of browser-based RDP
- Unable to copy and paste the document to the remote desktop.
If you are getting a protocol error, after upgrading the Node version you just need to add --tls-min-v1.0 to the nodejs command in Settings -> General -> Miscellaneous -> Nodejs Command.
Troubleshooting Steps:
Step 1: Ensure that the Node version is above 19 and the NPM Version is >=6
root@gateway:~# npm -v
6.14.6
root@gateway:~# node -v
v19.0.0
Step 2: To get more detailed errors, append log_level trace in ez.conf.
Step 3: Kill the current running node
root@gateway:~# pkill node
Step 4: Run the below command to get the web RDP start command from the latest log file, and then append DEBUG=* at the beginning of the command you get:
root@gateway:~# ( cd $(awk '/^system_folder/ {print $2}' /usr/local/etc/ezlogin/ez.conf)/application/logs/ && less $(ls -t log-*.php | head -n 1) ) | grep -i 'RDP node: PORT'
DEBUG - 2025-05-27 14:40:47 --> start RDP node: PORT=22555 DBP='s}T@2Wrbu(33Ab@@*6Z.m9D@!7' /usr/local/bin/node /var/www/ezlogin/application/external/mstsc/server.js >/dev/null 2>&1 &, 0, Array
For example:
root@gateway:~# DEBUG=* PORT=22555 DBP='s}T@2Wrbu(33Ab@@*6Z.m9D@!7' /usr/local/bin/node /var/www/ezlogin/application/external/mstsc/server.js
The recording RDP session feature is available from Ezeelogin version 7.10.0
Related Articles:
How to fix RDP SSL error in Ezeelogin?
RDP Error: This computer can’t connect to the remote computer
Troubleshooting "Connection has been closed" Error in Ezeelogin RDP via Browser
Ezeelogin RDP proxy could not be started
How to record and download RDP recordings?