Integrate Windows AD with Ubuntu using SSSD
How to integrate Windows AD with Ubuntu 18/20/22 using SSSD?
Overview: This article provides a step-by-step instructions for integrating Ubuntu 18, 20, or 22 with Windows Active Directory (AD) using System Security Services Daemon (SSSD) for centralized authentication and user management.
1. Ensure the following ports on the Ubuntu host are open and accessible to the AD domain controllers:
DNS: 53 , LDAP: 389, Kerberos: 88 & 464, LDAP Global Catalog: 3268, NTP: 123 (UDP)
2. Additionally, verify that system time on both the Ubuntu host and the Windows AD domain controllers is synchronized. Kerberos authentication requires time synchronization to function correctly.
Refer article to correct server time in Centos, RHEL, Ubuntu, SUSE
Step 1: Login to Ezeelogin Web-GUI > open settings > Ldap. Add the details of LDAP configurations.
Multiple URIs or a list of URIs can be specified in the format:
- ldaps://host.com:636/ ldaps://host.com:636/
(Only the protocol, hostname, and port fields are allowed.)
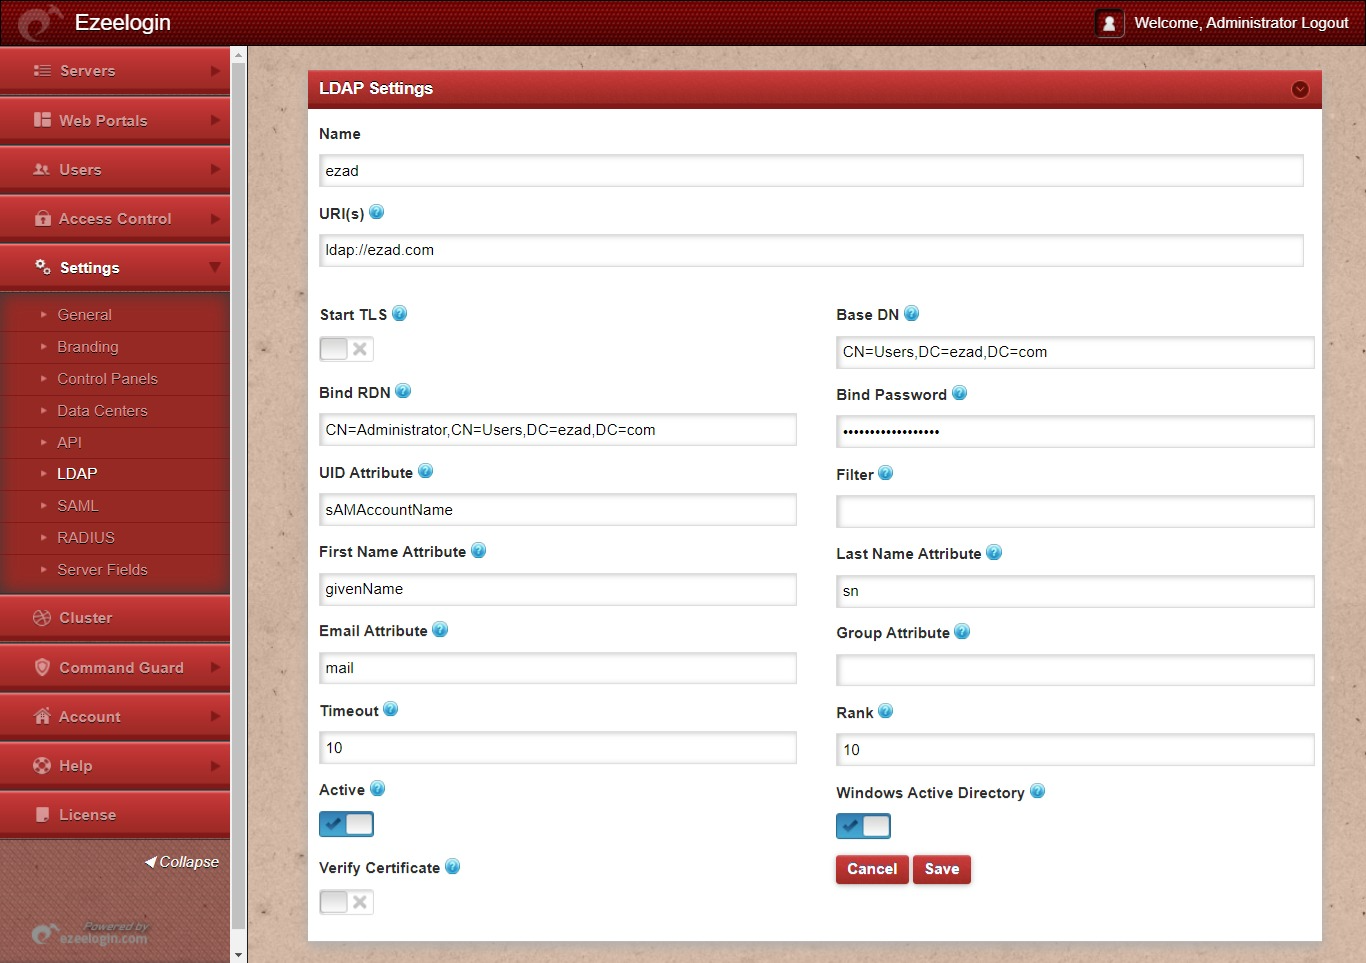
Verify Certificate feature is only available from Ezeelogin version 7.35.0.

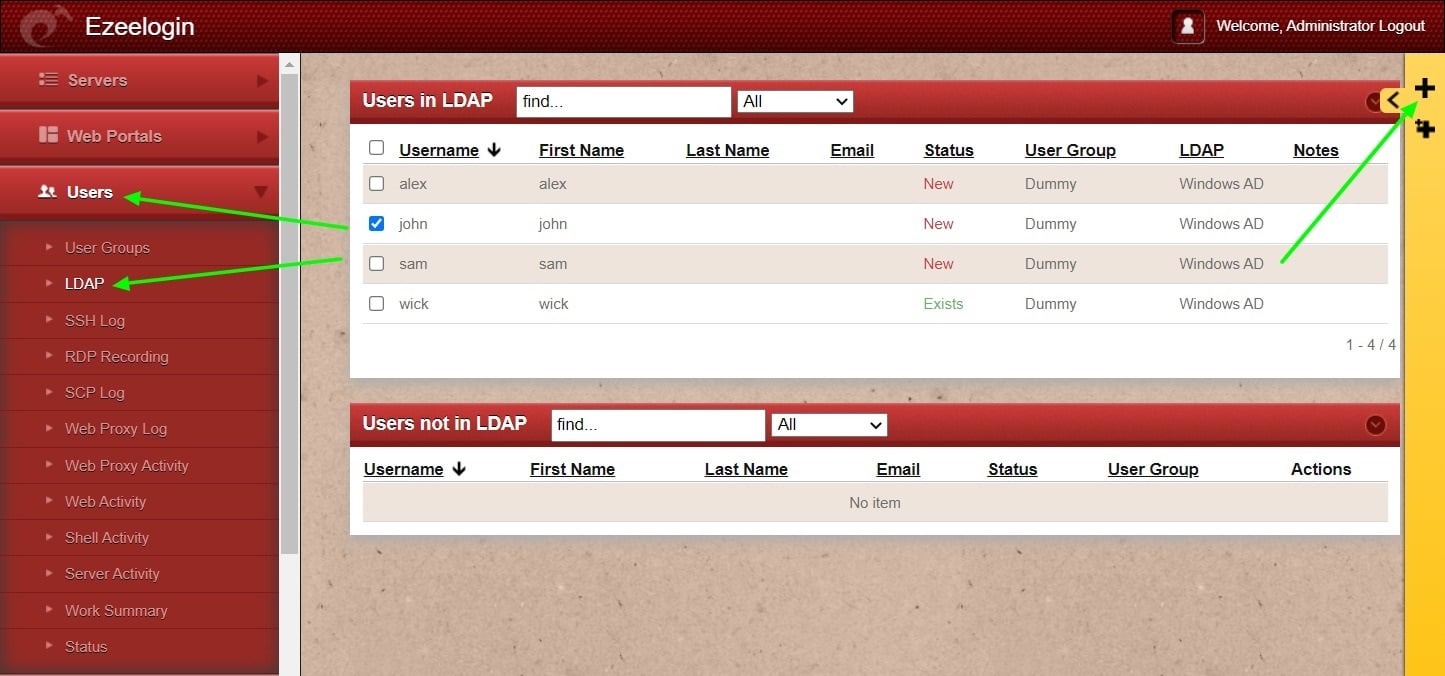
You can confirm the imported LDAP users were listed in the Users tab in Ezeelogin GUI. You will be able to log in to Ezeelogin GUI with windows user credentials.

Backend configuration to integrate Windows with Ubuntu
Step 1: Install the required packages.
root@gateway :~# apt-get install realmd sssd oddjob oddjob-mkhomedir adcli samba-common krb5-user nscd -y
Step 2: Provide Windows IP and Windows domain name in hosts file.
root@gateway :~# vim /etc/hosts
windows_ip windows_domain_name
Step 3: Provide Windows IP in resolv.conf to resolve and discover the AD domain.
root@gateway ~]# vim /etc/resolv.conf
nameserver windows_ip
Step 4: Check if AD domain discovery is successful. Refer below example with ldapad.com
root@gateway:~# realm discover ldapad.com
ldapad.com
type: kerberos
realm-name: LDAPAD.COM
domain-name: ldapad.com
configured: kerberos-member
server-software: active-directory
client-software: sssd
required-package: sssd-tools
required-package: sssd
required-package: libnss-sss
required-package: libpam-sss
required-package: adcli
required-package: samba-common-bin
login-formats: %U
login-policy: allow-realm-logins
Step 5: Join Ubuntu in the Active Directory domain. Replace Administrator with Windows admin account.
root@gateway :~# realm join ldapad.com -U Administrator
Password for Administrator:
Step 6: Confirm joining successfully with the realm list. Refer below example.
root@gateway :~# realm list
ldapad.com
type: kerberos
realm-name: LDAPAD.COM
domain-name: ldapad.com
configured: kerberos-member
server-software: active-directory
client-software: sssd
required-package: sssd-tools
required-package: sssd
required-package: libnss-sss
required-package: libpam-sss
required-package: adcli
required-package: samba-common-bin
login-formats: %U
login-policy: allow-realm-logins
Step 7: After successful joining you will get below sssd.conf and you need to change use_fully_qualified_names to False and shell to ezsh.
root@gateway :~# vim /etc/sssd/sssd.conf
[sssd]
domains = ldapad.com
config_file_version = 2
services = nss, pam
[domain/ldapad.com]
ad_domain = ldapad.com
krb5_realm = LDAPAD.COM
realmd_tags = manages-system joined-with-adcli
cache_credentials = True
id_provider = ad
krb5_store_password_if_offline = True
default_shell = /bin/bash
ldap_id_mapping = True
use_fully_qualified_names = False
fallback_homedir = /home/%u@%d
access_provider = ad
override_shell = /usr/local/bin/ezsh
Step 8: Enable autocreate home directory on login by adding the following to /etc/pam.d/common-session by the following command
root@gateway :~# echo "session optional pam_mkhomedir.so skel=/etc/skel umask=077" >> /etc/pam.d/common-session
Step 9: Restart sssd and nscd using the below commands.
root@gateway :~# systemctl restart sssd nscd
Step 10: Run id username /getent passwd username and see AD user details.
root@gateway :~# id john
uid=1701601108(john) gid=1701600513(domain users) groups=1701600513(domain users)
root@gateway :~# getent passwd john
john:*:1701601108:1701600513:john user:/home/[email protected]:/usr/local/bin/ezsh
Use the below command to clear the cache of the user.
root@gateway :~# sss_cache -u username
Related Articles:
Integrate Windows AD with RHEL 8 using SSSD