Role Based Access Control in SSH
Role-Based Access Control (RBAC) and it's implementation in SSH
Overview: This article explains implementing Role-Based Access Control (RBAC) in SSH using Ezeelogin to restrict user access, manage permissions, and enhance security through an SSH gateway with MFA integration.
Role-Based access control (RBAC) is a security model which is used to manage data and user access in organizations; providing control over the access permissions and simplifying the management to comply with the requirements.
Why RBAC in SSH?
Managing thousands of SSH users across servers without control can pose serious risks. RBAC ensures only authorized access is granted.
How Role-based access control can be implemented in SSH?
Implementing Role-Based Access Control (RBAC) in SSH ensures that SSH users or administrators have only the minimal access required to perform their duties on the server. In other words, role-based access control (RBAC) in SSH is a method used to restrict SSH users' access or server administrators' access to remote servers based on their specific roles. Most enterprises manage thousands of servers, making granting SSH access to employees a significant challenge and security concern. By using role-based access access control (RBAC), organizations can ensure that SSH users or system administrators only access the relevant information necessary to perform their tasks. Additionally, organizations can restrict access to specific groups of servers and control the actions users can take on those servers.
- Key Principles include role based, permission based, separation of duties, the centralized, auditable trial of users, and dynamic changes.
- Key Components include Users, Permissions, and Roles. It allows flexible management of user access by allowing and modifying roles and permissions as per need.
Benefits of Role-based access control in SSH
When we talk about the benefits of Role based access control ( RBAC), being a powerful security model it helps in improved security(Limits exposure and access to only necessary systems.), Flexibility & Scalability(Roles can be adapted as teams grow.), Cost-effective(Less time managing permissions individually.), and Simplified Access management(Centralized control and easy auditing.)
SSH Gateway and RBAC Integration
What is an SSH Gateway?
- Acts as a mediator between a user and target server.
- Facilitates secure connections, logging, and access control.
An SSH Gateway plays a crucial role in securing SSH access within a network. SSH gateway uses a secure shell protocol to securely connect to other servers within a network; acting as a mediator between a user’s computer and a target server facilitating secure remote connections.
Role of RBAC in SSH Gateway
- Control access after authentication.
- For Example:
- A developer authenticates to the SSH gateway.
- Role restricts them to only “Staging” servers and blocks access to “Production”.
Integrating Role Based Access Control with an SSH gateway further strengthens security by controlling what each user can do once they are inside the network. Instead of allowing unrestricted access, role based access control can limit a user’s actions even once they authenticate through the SSH gateway. For example, a user with limited permissions may be able to connect to the gateway but can only access a specific set of servers or perform certain actions on them, based on their role.
Importance of Security in SSH Gateway
- Prevent data breaches
- Control unauthorized access
- Reduce risk from internal/external threats
You can also implement multi-factor authentication (MFA) in users for added security
Refer detailed article for user authentication - MFA authentication for user
Implementing RBAC in SSH Using Ezeelogin.
How to configure role based access control?
To achieve this, we can group the servers and SSH users into different categories based on our requirements and we can decide which user or user group can get access to which server group. Ezeelogin has the feature RBAC. Using this, you can configure role based access control in ssh.
Configuring rbac in SSH using ezeelogin jump server
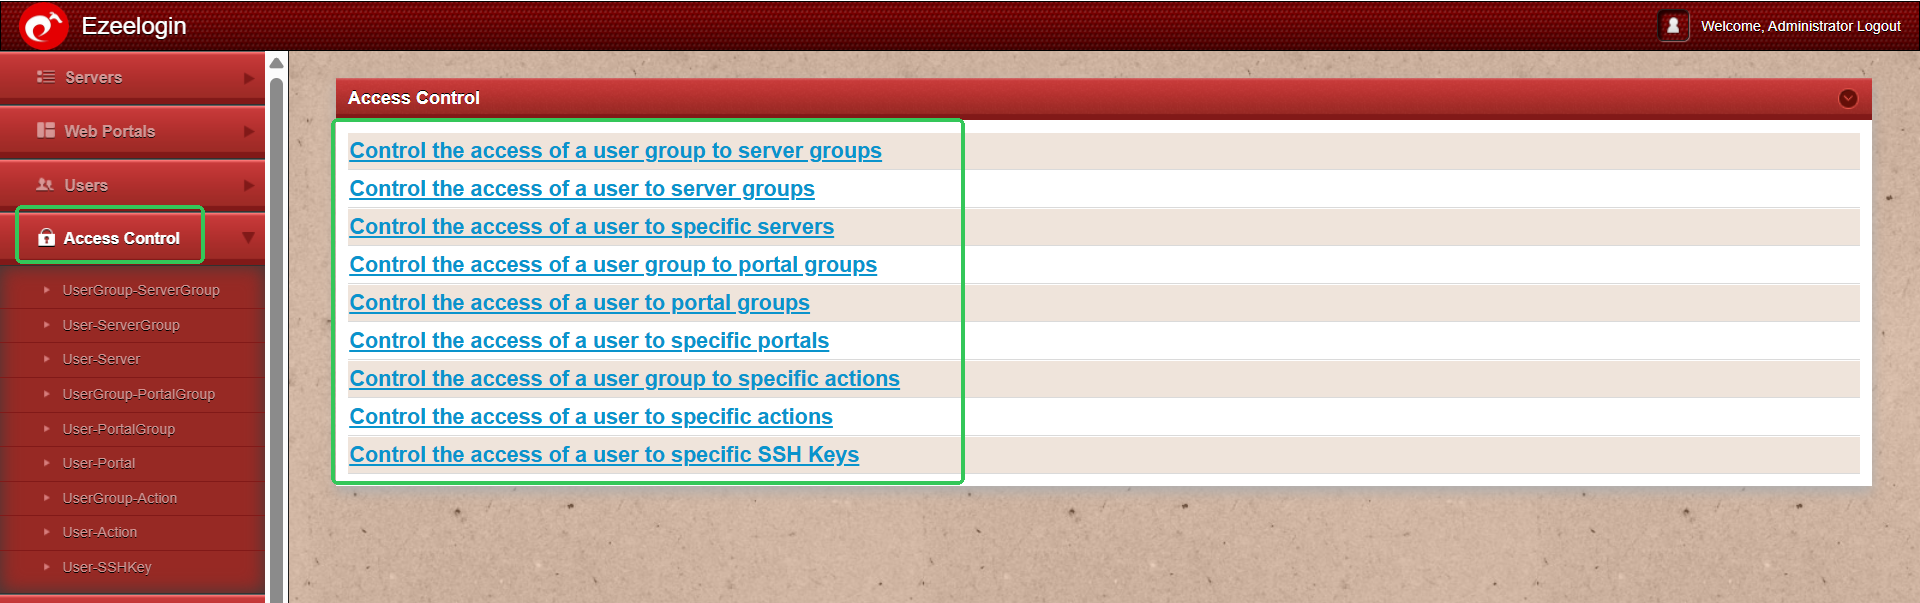
Different ways to achieve Role based access control (RBAC) in ssh :
- Restrict user actions on the server
- Map ssh user to a particular server
- Map ssh user to a group of servers
- Map ssh user group to a single server
- Map ssh user group to group of servers
Step-by-Step Configuration Example
In this example, we will demonstrate how to implement Role-Based Access Control (RBAC) in Ezeelogin by assigning appropriate permissions to the Developer Team and the Admin Team, each requiring different levels of SSH access to infrastructure.
Step 1: Set Up User Groups for Streamlined Permissions
Begin by organizing users into distinct groups based on their roles. This simplifies the process of assigning permissions and ensures better access control.
- Developer Group – For users involved in coding, testing, and development tasks.
- Admin Group – For users responsible for system administration and configuration.
To create these groups:
Go to the Users tab > User Groups > Click the ‘+’ icon to add a new user group. Name each group accordingly and save.

Step 2: Add Users to Their Respective Groups
Once user groups are set up, the next step is to add individual users and assign them to the appropriate groups based on their roles.
- Add developers to the Developer Group
- Add administrators to the Admin Group
To do this:
Go to the User menu > Click the ‘+’ icon > Create users and assign each to the relevant user group. Repeat the process to add as many users as needed.


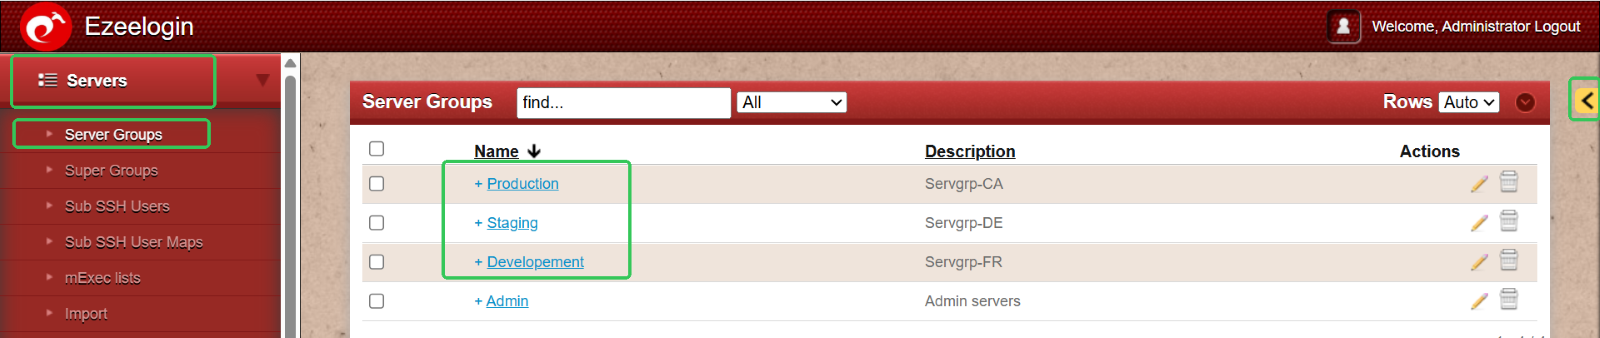
Step 3: Organize Infrastructure with Server Groups
To manage your infrastructure efficiently, group servers based on their environment or purpose. Common server group classifications include:
- Production – Live environment serving end users
- Staging – Pre-production environment for final testing
- Development – Environment for active development and testing
To set this up:
Go to Servers > Server Groups > Click the ‘+’ icon to create and name each server group accordingly.
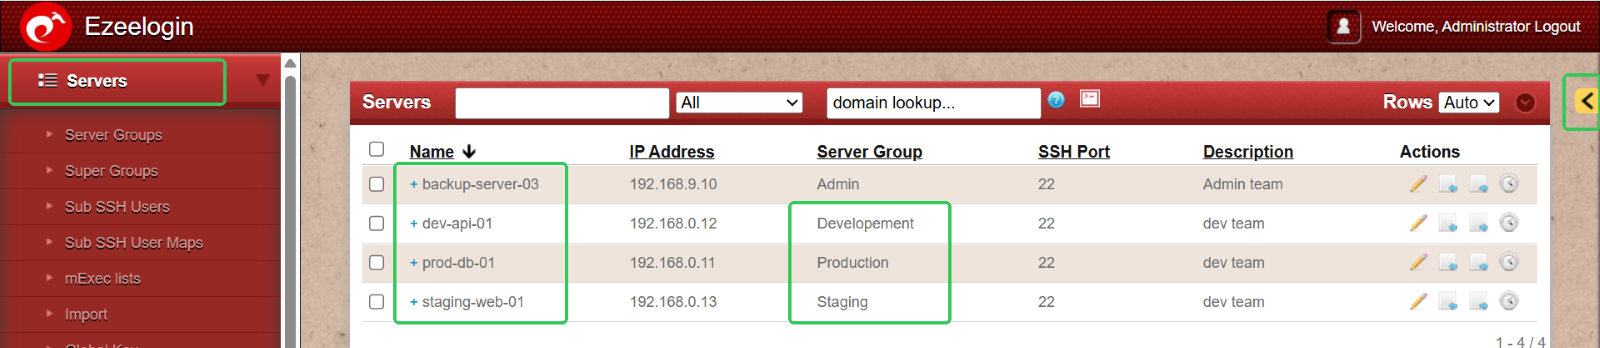
Step 4: Add Servers to the Appropriate Server Groups
With your server groups in place, the next step is to add individual servers and assign them to their respective groups for better organization and access control.
To do this:
Go to the Servers menu > Click the ‘+’ icon > Create new servers and assign each to the relevant server group during setup.
This ensures a clear separation between environments like Production, Staging, and Development, making management more efficient.
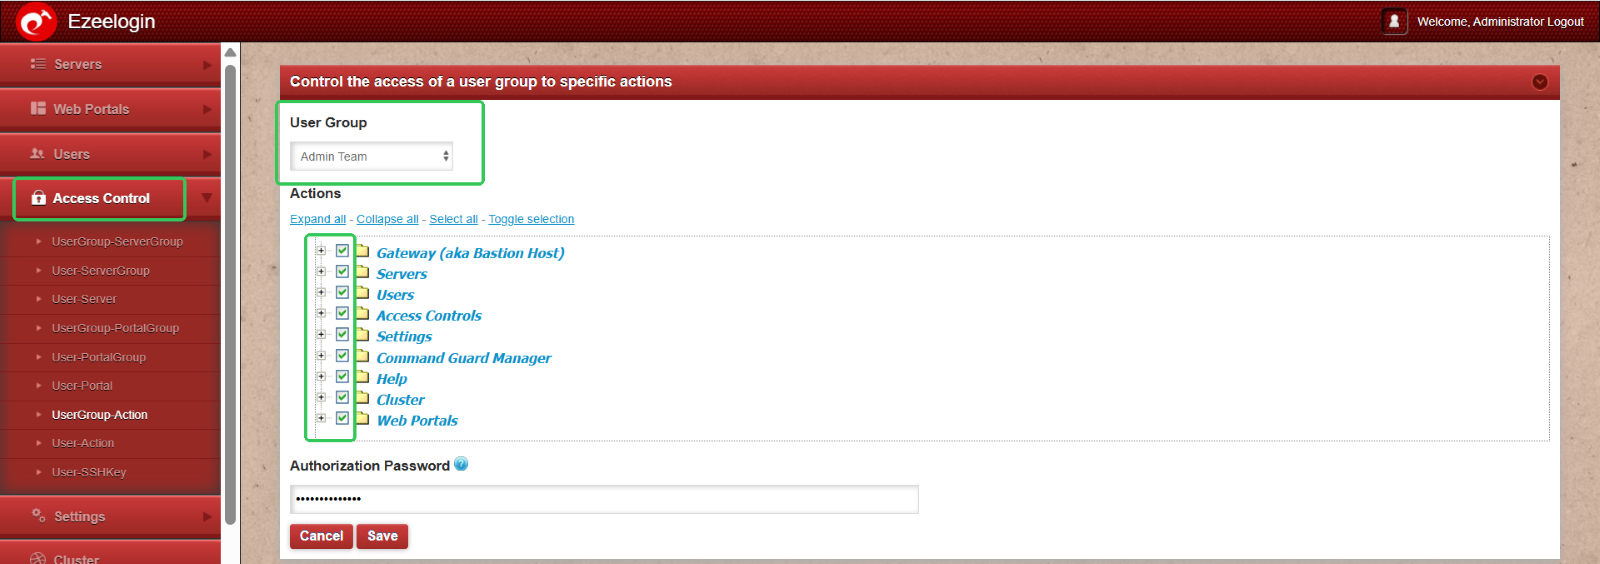
Step 5: Assign Role-Based Access Permissions
Ensure that each user group has appropriate access by configuring permissions based on their responsibilities.
- For example: Admin Group – Requires full access to all server groups.
To grant full access to the Admin Group:
Navigate to Access Control > User Group Actions > Select the Admin Group > Enable all permission options and save the changes.
This role-based approach helps maintain security while giving users the access they need to perform their tasks effectively.
Step 6: Developer Group: Controlled Access to Staging and Development Environments
To maintain security and follow the principle of least privilege, the Developer Group should have carefully controlled access. Here's how to configure granular permissions:
- Server Access: Restrict access to only Staging and Development servers.
- Shell Access: Allow shell access only on specific, authorized servers.
- SSH Session Recording: Enable recording for all sessions; developers should not have the ability to view or delete these recordings.
- Log Visibility: Grant log access selectively, based on project needs.
- Multi-Factor Authentication (MFA): Enforce MFA for all members of the Developer Group.
- Deletion Rights: Completely restricted—developers should not have permission to delete any resources.
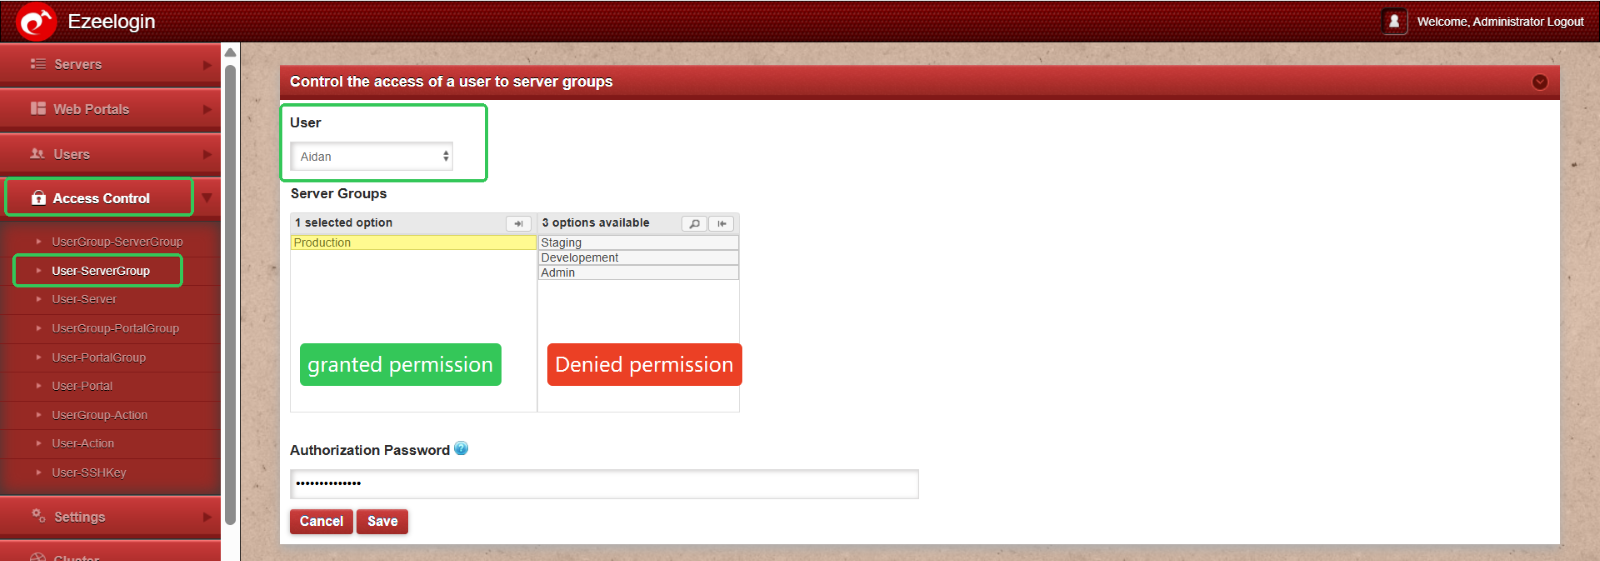
To apply these restricted permissions:
Navigate to Access Control > Select the user (e.g., Aiden) > Assign limited access to specific servers > Adjust individual permissions as needed > Click Save.
This setup ensures that developers have the tools they need without compromising system integrity or exposing critical environments like Production.
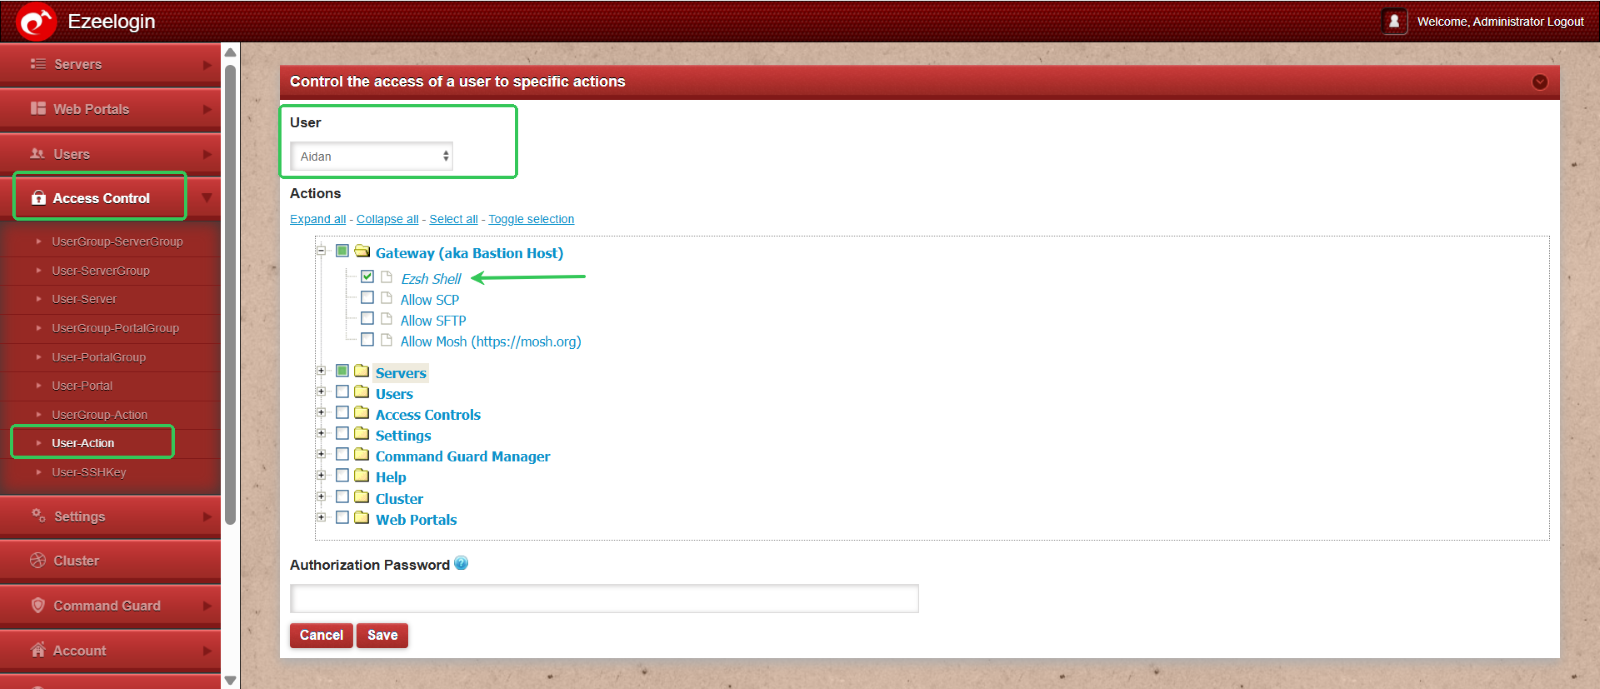
Granting Shell Access to a Production Team Member
To provide shell access to a user from the Production team:
Navigate to Access Control > User Actions > Select the user (e.g., Aiden) > Enable shell access by selecting the Ezsh shell option > Click Save to apply the changes.
This allows the user to securely access the server shell as per their role requirements.
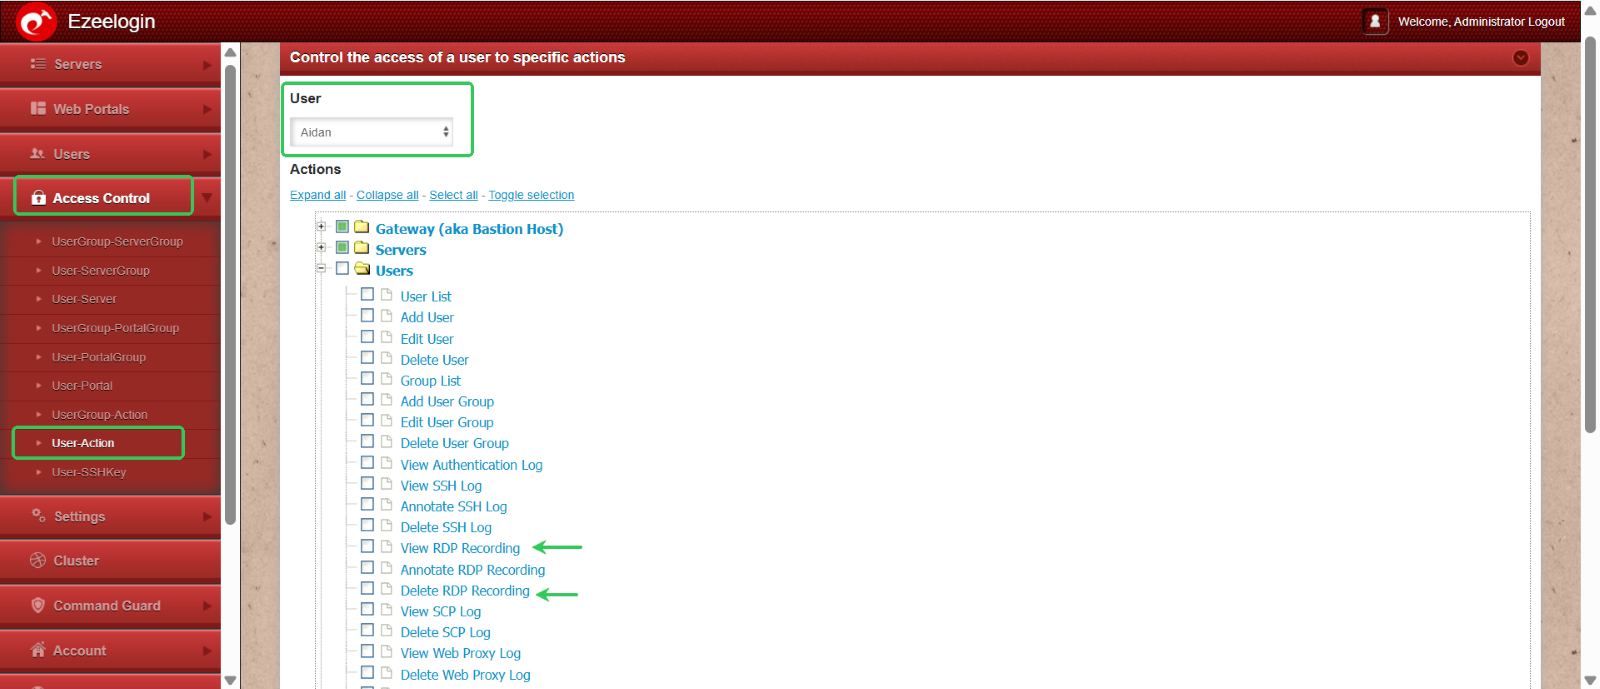
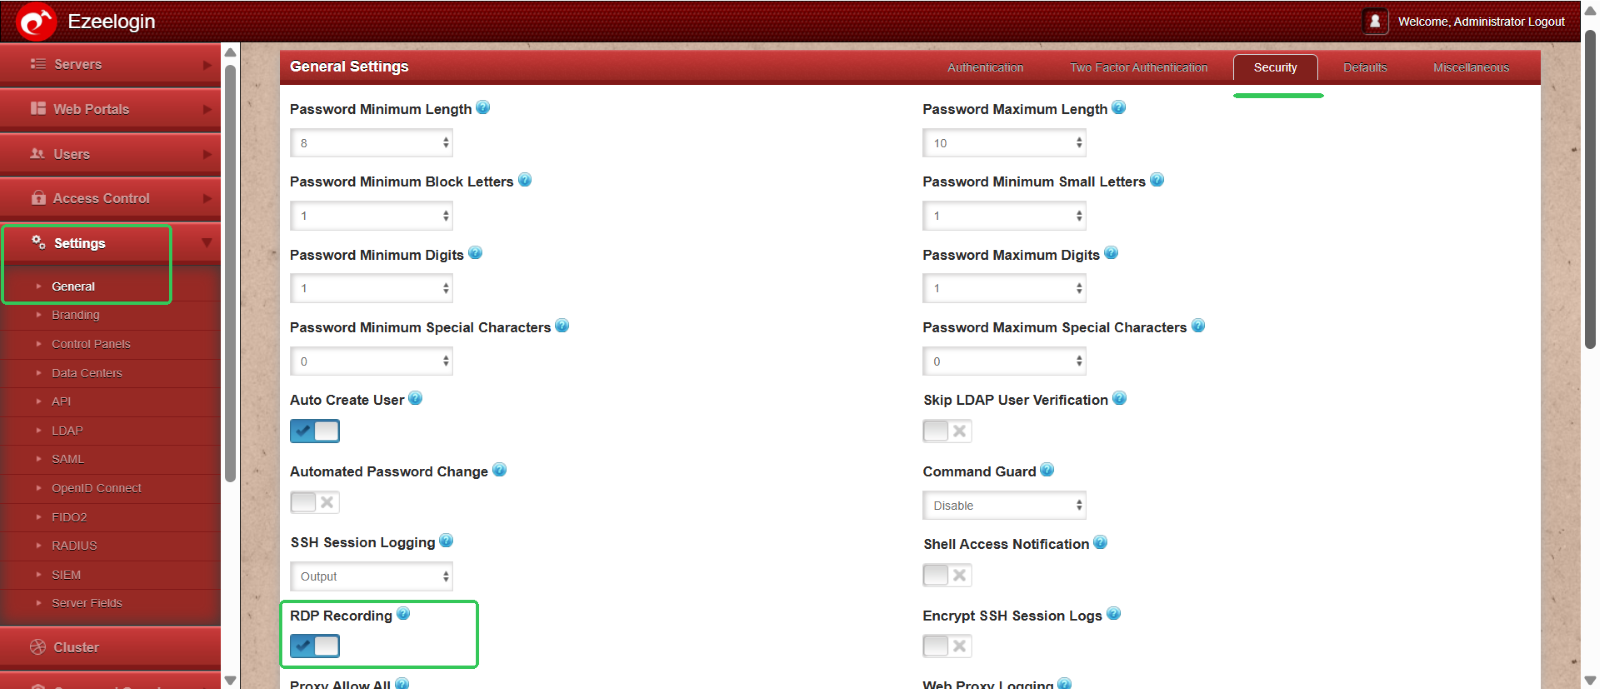
Restricting RDP Recording Access for a Production Team Member
While RDP session recording is enabled globally for all users via Settings > Security Session > Enable RDP Recording, you may need to limit individual user access to these recordings.
To prevent a user (e.g., Aiden) from viewing or deleting RDP recordings:
Go to Access Control > User Actions > Select the user (Aiden) > Disable permissions for viewing and deleting RDP recordings > Click Save.
This ensures that the user’s sessions are recorded for auditing purposes, without granting them access to the recordings.
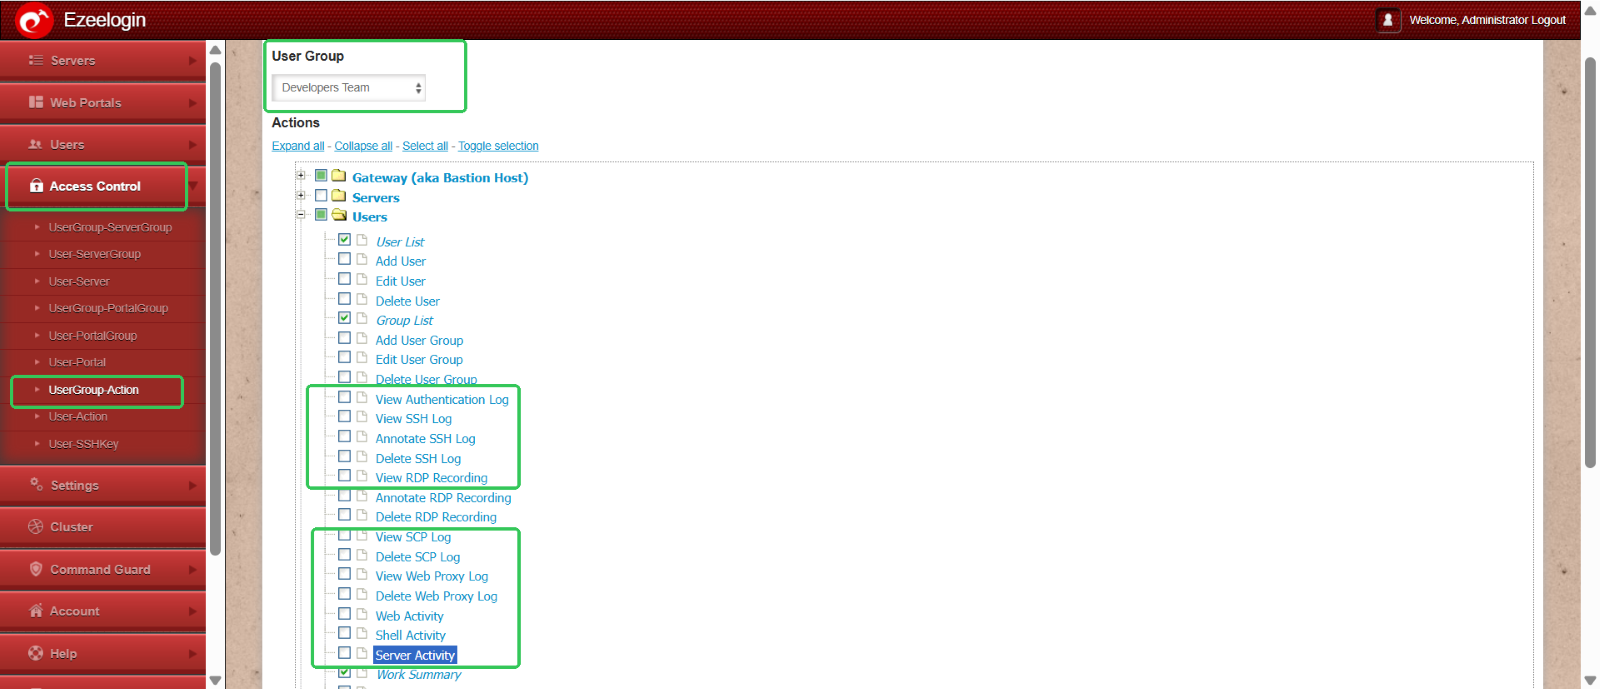
Log visibility:
To restrict the log visibility of users navigate to acess control > UserGroup Action . Select Developers Group and disable the log visibilty for the developer group users.
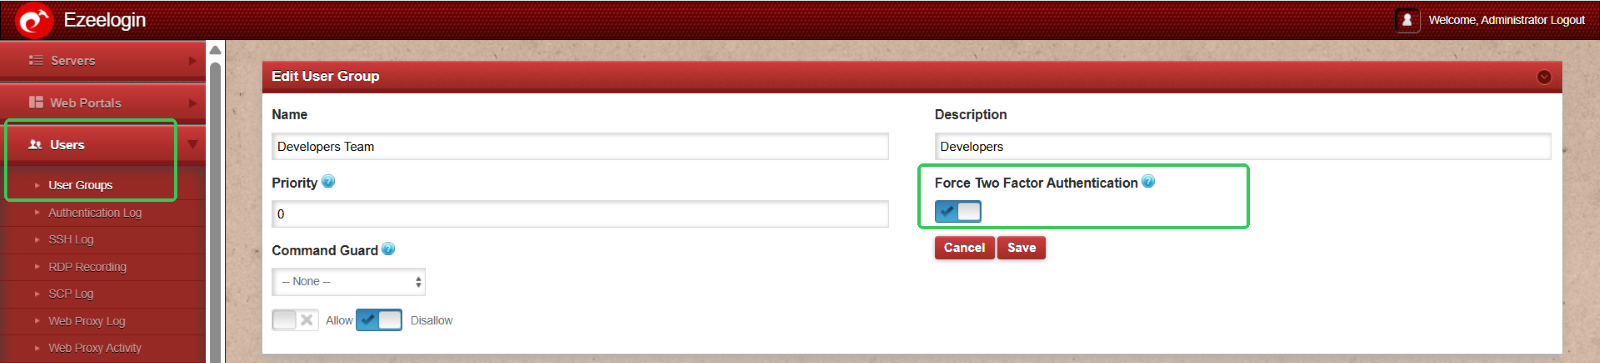
Multi-factor authentication: To enable multi-factor authentication for user groups. Naviagte to Usergroups and on editing you can enable the 2fa for all those user groups (ex: developers team)
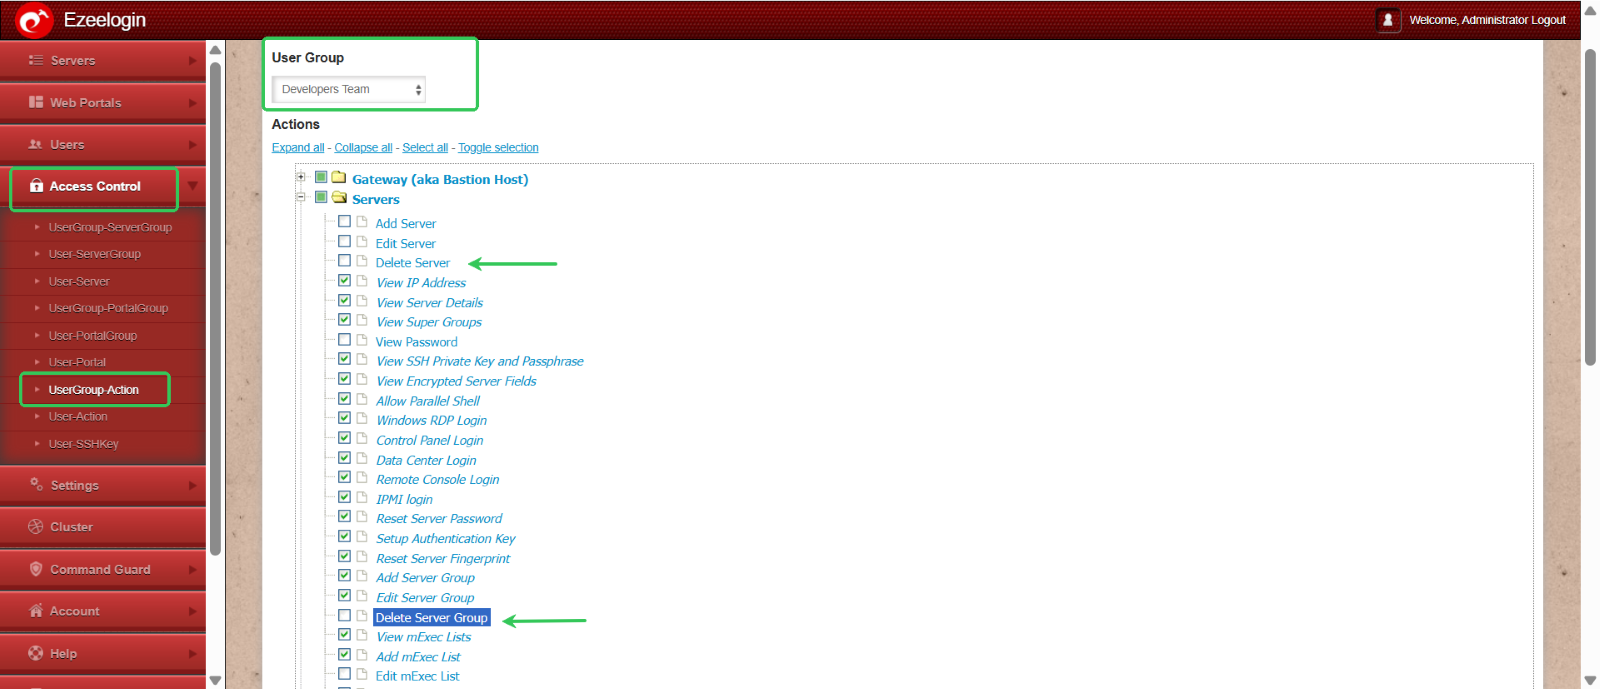
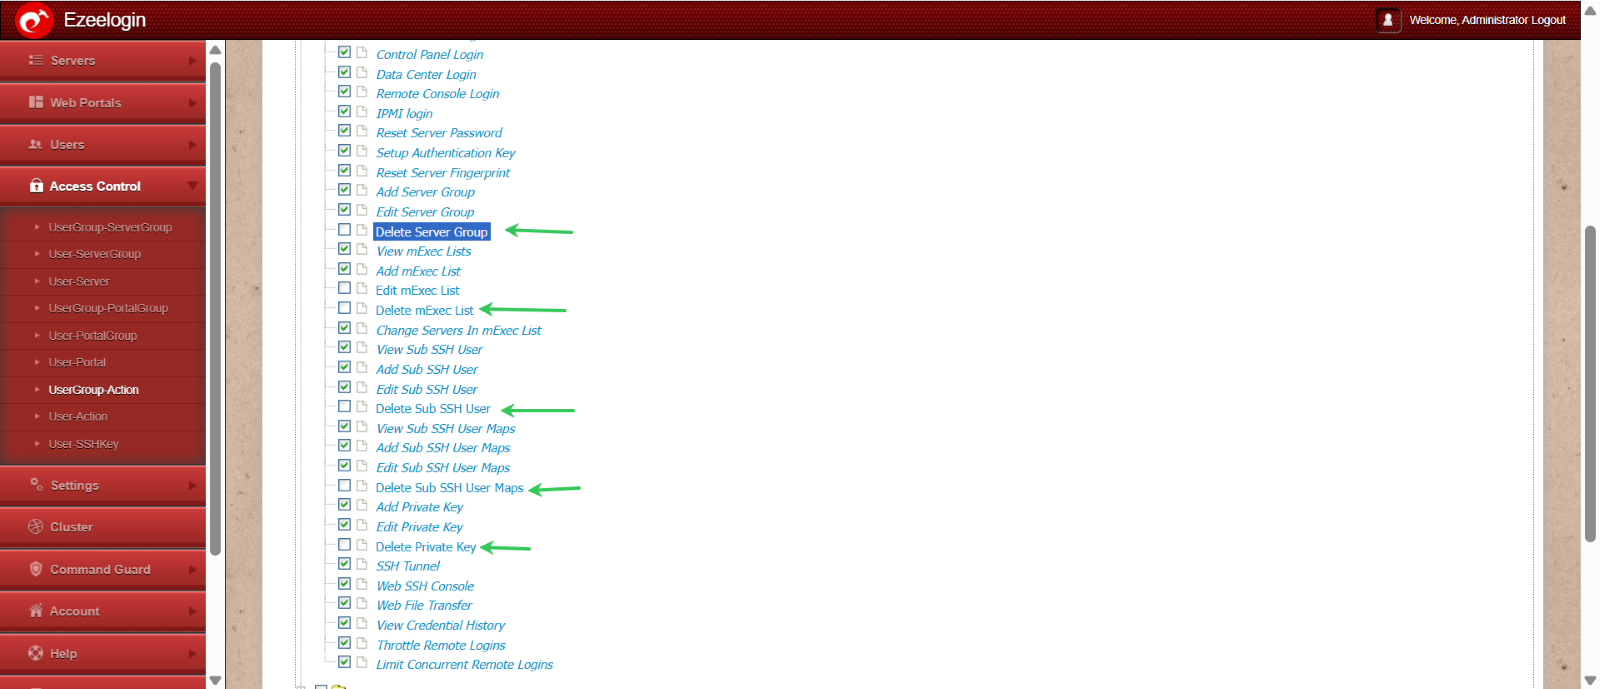
Deletion rights: To restrict the deletion rights of Developers Group Select the UserGroup Action under Access control and disable all the deletion rights of Developers Group.
This structured RBAC approach enhances security by minimizing risk, supporting auditability, and maintaining operational control across environments.
Refer to the following articles to generate all these user reports as CSV files: Generate user reports
Related Articles: