Authentication of Ezeelogin gateway users using Public keys fetched from Active Directory server
Authentication of SSH users using Public keys fetched from the Active Directory server
Overview: This article describes the process for extending the Active Directory schema to add SSH key attributes on Windows Server 2012 and 2016, including schema updates, attribute and class creation, user association, and integrating with Ezeelogin for SSH key retrieval.
- Extending the Active Directory schema to add SSH key attributes in Windows Server 2012 and 2016.
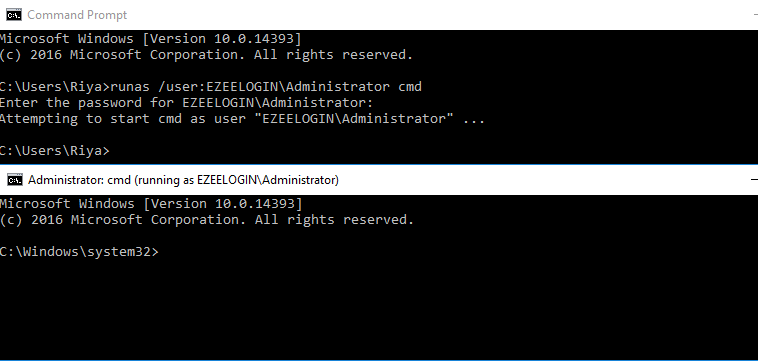
1. Launch a cmd prompt then spin up an Administrator cmd by running the following script.
C:\Users\Administrator> runas /user:DOMAIN\Administrator cmd
- You'll get the following terminal after running the above command on cmd.
2. To open the Registry Editor run the following command on Administrator cmd.
C:\windows\system32> regedit
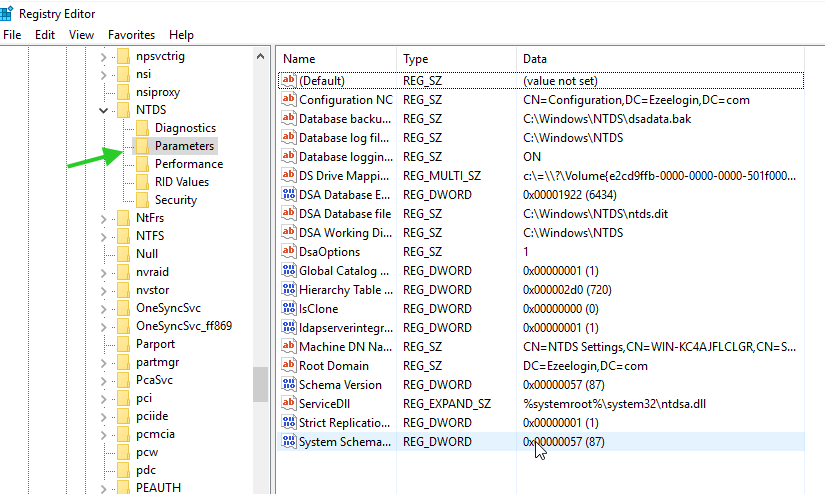
3. Enabling Schema updates in Registry Editor
Browse to HKEY_LOCAL_MACHINE\SYSTEM\CurrentControlSet\Services\NTDS\Parameters and add a new DWORD key named Schema Update Allowed.
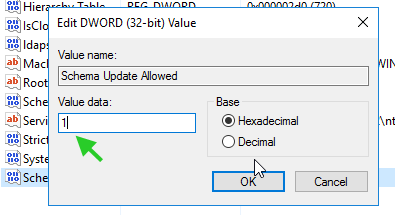
- Add Dword with value name Schema Update Allowed and value data 1.
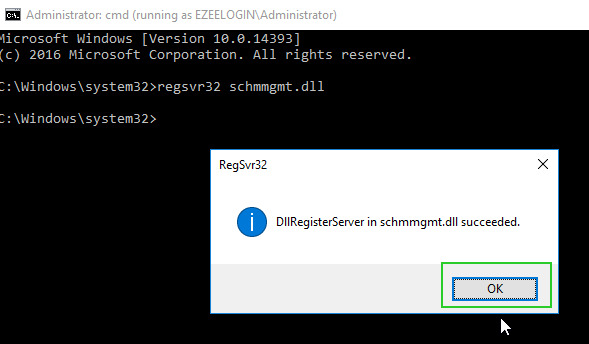
4. Run the following in the Administrator command prompt to enable the schema editor snap-in.
c:\Windows\system32> regsvr32 schmmgmt.dll
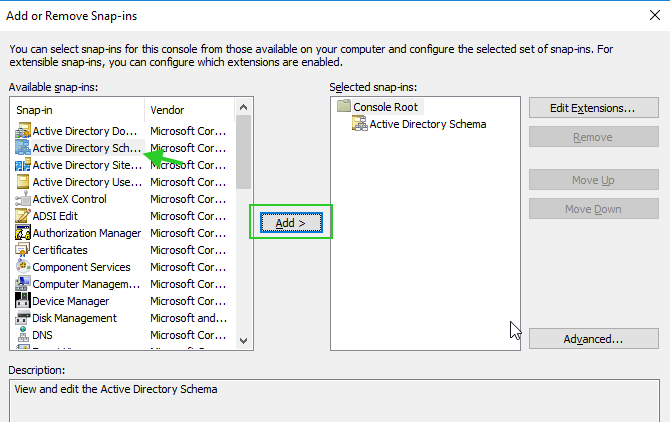
5. Run mmc in the Administrator command prompt to open the Management console. Click on Ctrl + M and add Active Directory Schema as follows.
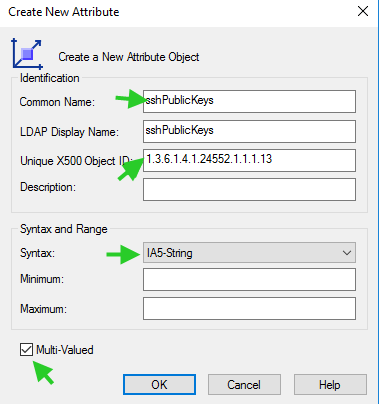
6. Creating a new attribute in Active Directory.
Right Click on Attributes and click ‘Create New Attribute’. Provide the Common Name and LDAP Display Name as sshPublicKeys , ‘Unique X500 Object ID’ as 1.3.6.1.4.1.24552.1.13, Syntax, select IA5-String , finally select the Mutli-Valued box, and click Okay.
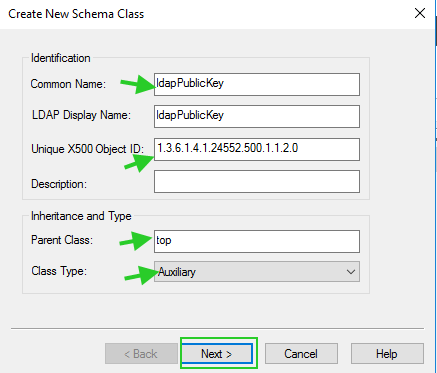
7. Create a new class for the attribute.
Right-click on Classes and click ‘Create class’. Add 'Common Name’ and ‘LDAP Display Name’, as ldapPublicKey , 'Unique X500 Object ID’ as 1.3.6.1.4.1.24552.500.1.1.2.0, Parent Class as ‘top’, and for Class Type select ‘Auxiliary’. After providing the necessary fields click on the Next button.
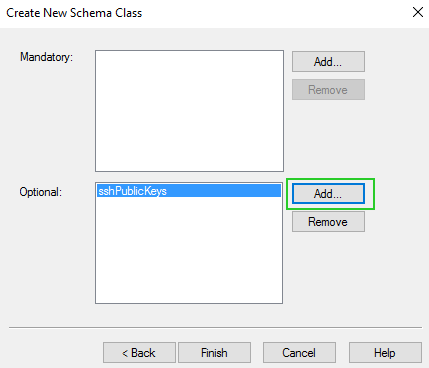
- Add sshPublicKeys under Optional as follows.
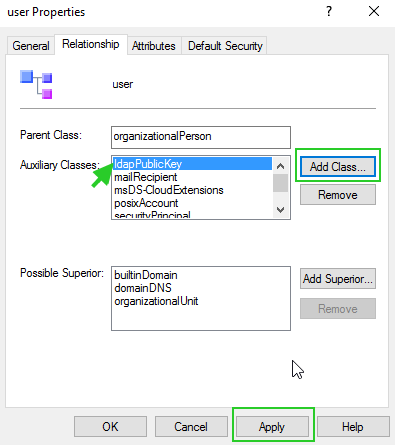
8. Associating that class to user objects.
Expand the Classes and right-click on User then select properties. Click on the Relationship tab then click Add Class under Auxiliary class.
Finally, Add ldapPublicKey and click ‘Apply’.
9. Close all other windows open Active Directory Users and Computers(ADUC) and enable the Advanced feature as follows.

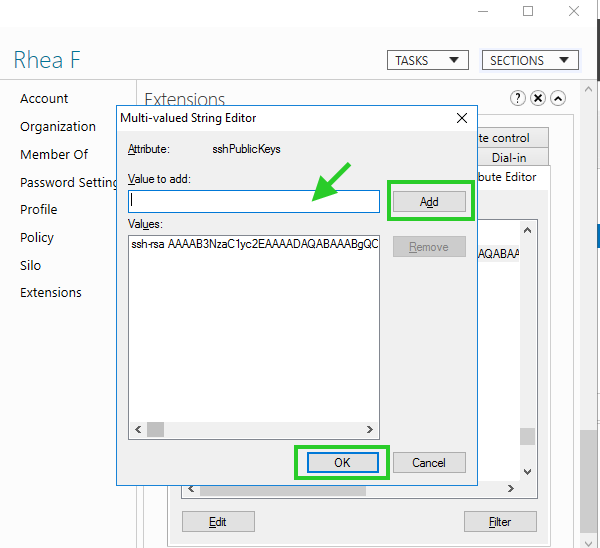
10. Browse to the user and add public keys under Extensions >> Attribute Editor >> sshPublicKeys.
11. Creating script on Ezeelogin server to fetch SSH key from AD
- Create the following script on your Ezeelogin server under /usr/local/fetchsshkeys.
Note: Replace the Basedn, Hostname_or_IP , Binddn , and Password with your Active Directory credentials.
#!/bin/bash
ldapsearch -x '(&(objectClass=*)(sAMAccountName='"$1"'))' 'sshPublicKeys' -b "Base DN" -H ldap://Hostname_or_IP -D "Bind_RDN" -w 'password' | sed -n '/^ /{H;d};/sshPublicKeys:/x;$g;s/\n *//g;s/sshPublicKeys: //gp'
12. Add the following lines on the gateway server to your sshd_config file to point to the script
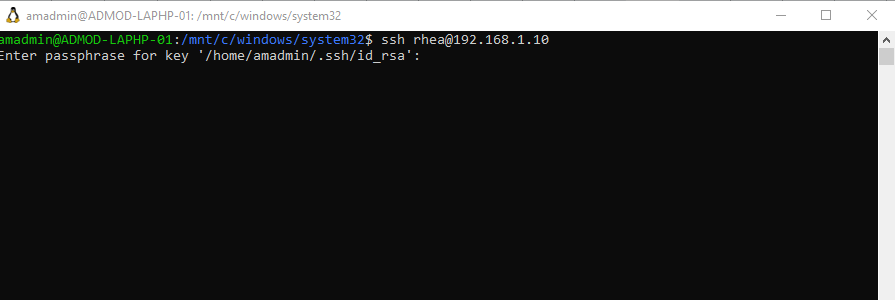
- Now, the user "rhea" will be authenticated using the public key fetched from the Active Directory server.
1. Ensure that the ssh public key is fetched for the user rhea from the Openldap server by running the following command:
root@jumpserver:~# ldapsearch -x '(&(objectClass=*)(sAMAccountName='"rhea"'))' 'sshPublicKeys' -b "OU=EzAdmin,DC=Ezeelogin,DC=com" -H ldap://192.168.1.7 -D "cn=Administrator,cn=Users,dc=Ezeelogin,dc=com" -w 'zaQ!23edc123' | sed -n '/^ /{H;d};/sshPublicKeys:/x;$g;s/\n *//g;s/sshPublicKeys: //gp'
2. Ensure that the ssh public key is fetched for the user rhea from Ezeelogin installed server by running the script:
root@jumpserver:~# /usr/local/fetchsshkeys rhea
Related Articles: