Disable apache default page and replace with an error page.
Can we remove the welcome.conf page and replace it with any error page?
Overview: This article explains how to configure your web server (Apache or Nginx) to display a "403 Forbidden" error page instead of the welcome page when accessing your domain.

Do follow the below steps to disable welcome page and show up the forbidden page.
Step 1: Rename the Welcome Page Configuration.
Rename the welcome page configuration file to disable it.
:~# mv /etc/httpd/conf.d/welcome.conf /etc/httpd/conf.d/welcome.conf.backup
Step 2: Edit Apache Configuration.
Edit the Apache configuration file to make the necessary changes.
:~# vim /etc/httpd/conf/httpd.conf
Step 3: Modify Directory Options Locate the line that starts with <Directory "/var/www/html"> and make the following changes:
Before:
<Directory "/var/www/html">
Options Indexes FollowSymLinks
...
</Directory>
After:
<Directory "/var/www/html">
# Options Indexes FollowSymLinks
Options -Indexes
...
</Directory>
Step 4: Check Configuration Syntax and Restart Apache
Run a configuration test to ensure there are no syntax errors. If the test is successful, restart Apache.
:~# apachectl configtest
If the output is Syntax OK, proceed with restarting Apache.
:~# systemctl restart httpd
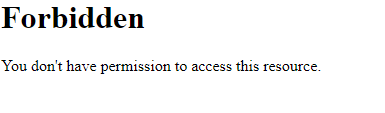
After completing these steps, try accessing your domain. You should see a "403 Forbidden" error page instead of the welcome page.
- If you are trying to configure the same with the nginx web server.

Step 1: Move the Default Nginx Welcome Page
Rename the Nginx welcome page (index.nginx-debian.html) to disable it.
:~# cd /var/www/html/ && mv index.nginx-debian.html index.nginx-debian.html.backup
Step 2: Create an error.html page.
Create a custom HTML error page named error.html using Nano (you can use any text editor you prefer):
:~# nano /var/www/html/error.html
<html lang="en">
<head>
<meta charset="UTF-8">
<title>Error Page</title>
<style>
body {
font-family: Arial, sans-serif;
background-color: #f4f4f4;
margin: 50px;
padding: 20px;
text-align: center;
}
h1 {
color: #333;
}
p {
color: #666;
}
</style>
</head>
<body>
<h1>Access Denied</h1>
<p>You do not have permission to access this page.</p>
</body>
</html>
Step 3: Configure Nginx to Use the Error Page.
Edit the Nginx default site configuration file (/etc/nginx/sites-available/default) to configure Nginx to use the custom error page for Access Denied error:
:~# nano /etc/nginx/sites-available/default
Before:
location / {
try_files $uri $uri/ =404;
}
After:
location / {
try_files $uri $uri/ =404;
}
error_page 403 /error.html;
location = /error.html {
internal;
}
Step 4: Test Nginx Configuration.
Test the configuration file and reload the nginx service.
:~# nginx -t
:~# systemctl reload nginx
Now try to access the domain and see for Access Denied Page.

Feel free to take the help of support if you encounter any issues or need further assistance!
Related Articles: