Install slave / secondary node for high availability in jump server
How to install a slave/secondary node for high availability in the Ezeelogin jump server?
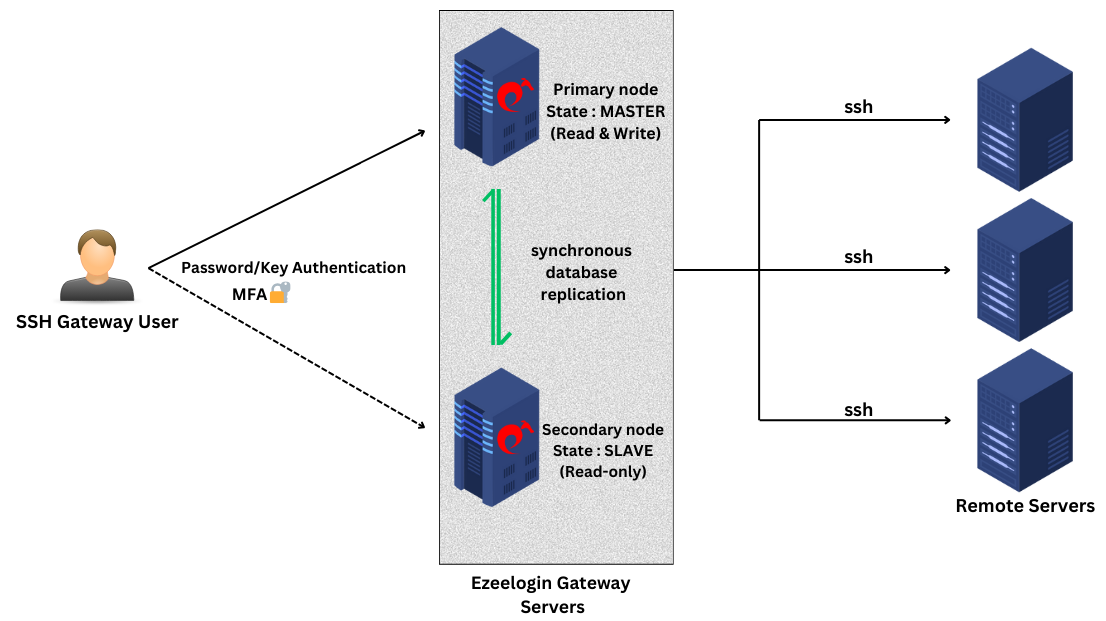
Synopsis: In a cluster configuration, Ezeelogin employs primary and secondary nodes to manage the gateway services. The primary node is responsible for the main operations and database management, while secondary nodes serve as backups and share the load, providing redundancy and failover capabilities.
The slave node acts as the failover in case the primary goes down. It is always recommended to set up the slave node so that servers are accessible at all times just in case the primary nodes are accessible due to hardware or network failures.
Advantages of having a slave node:
- Backup servers synchronized with the primary node.
- Ready to take over in case of primary node failure.
- Share the load with the primary node for scalability and redundancy.
Do affirm with the following note:
Note:
- Ensure that the slave IP is licensed.
- Ensure that the MySQL server is running on the slave. Also, make sure that MySQL listens to public IP on the master and slave nodes.
- Ensure the firewall on the master does not block mysql and ssh connections initiated from the slave.
- On the slave node, download the same binary package that was used on the primary. This is to ensure that the master and the slave node use the same version of Ezeelogin for the cluster to work.
Step 1: Log in to your Customer Portal area.
Step 2: Click on the license tab,
On the Old customer portal : Select your primary license, and click on the ’Buy Cluster’ link on the right.
On the New customer portal : Edit the license and add a Secondary IP address.
Step 3: Issue the slave/secondary license for the IP of the slave server.
NOTE: For standalone license: Rename the license file to ezlic.dat and place it under the /root/ directory.
Step 4: Refer to the following article to install Ezeelogin dependency packages and follow it till the 3rd step ( Ioncube loader).
How do you install Ezeelogin dependency packages?
Step 5: Download the same version of Ezeelogin in the slave / secondary server.
| Downloads | |
|---|---|
| For PHP version 8.2 and above: | https://downloads.ezeelogin.com/ezlogin_7.37.10_php82.bin |
| For PHP version 8.1.x: | https://downloads.ezeelogin.com/ezlogin_7.37.10_php81.bin |
| For PHP version 7.x (end of life): | https://downloads.ezeelogin.com/ezlogin_7.36.0_php71.bin |
| For PHP version 5.6 to 7.0 (end of life): | https://downloads.ezeelogin.com/ezlogin_7.27.6_php56-70.bin |
| For PHP version 5.3 to 5.5 (end of life): | https://downloads.ezeelogin.com/ezlogin_7.10.0_php53-55.bin |
:~# wget https://downloads.ezeelogin.com/ezlogin_7.x.x.bin
Step 6: Execute the following command on the primary server to grant access to the Ezeelogin database from the secondary/slave node
:~# php /usr/local/ezlogin/grant_host.php <ip_address of secondary node/slave>
If you are planning to connect to remote MySQL/RDS servers, you should grant access to the database on the remote database server.
This is not required if your MySQL server is running on localhost.
(Replace "root" with database admin user & ’PASSWORD’ with your database admin user password)
mysql> GRANT ALL PRIVILEGES ON *.* TO ’root’@’%’ IDENTIFIED BY ’PASSWORD’ WITH GRANT OPTION;
mysql> flush privileges;
Step 7: Execute the following command on the slave/secondary node
sh ezlogin_7.x.x.bin -- -secondary <ip_addr of secondary node> -othernode <ip_addr of master node>
If you are getting the following error after installation "ERROR granting access for DB user: Access denied for user ’root’@’%’ to database ’ezlogin_jzgzs’ ", run the following command to grant privileges manually. This error usually pops up while using remote MySQL database/ RDS connections.
Login to MySQL as root or admin user & replace with your Ezeelogin database credentials. Ezeelogin database credentials such as dbname, dbusername & dbpassword will displayed on the installation screen[reviewsettings]) or you can refer the article to retrieve Ezeelogin database credentials.
root@gateway:~# mysql -u root -p
mysql> grant all on ezeelogin_dbname.* to ’ezlogin_dbusername’@’%’ identified by ’ezeelogin_dbusername_password’ ;
mysql> flush privileges;
For Example: mysql> grant all on ezlogin_jzgzs.* to ’ezlogin_xynqwd’@’%’ identified by ’!T3}3w$czV$6VrWxG)kn{5&3t5’;
(Database credentials such as dbname, dbusername & dbpassword will displayed on the installation screen [reviewsettings] )
Step 8: Append the below lines in /etc/ssh/sshd_config on both master and slave nodes.
FAQ:
1. Can we disable the slave server since we are currently using only the master node?
Certainly, the choice to disable the slave server is yours, but keep a note that data synchronization between the master and slave servers will not occur if the slave is disabled. Keeping both servers running and synchronized for real-time data updates is recommended, as changes made to the master server will automatically sync with the slave server.
Related Articles:
Verify the Database to sync tables in a database.
Create a load balancer in AWS for the Ezeelogin cluster
Reset Cluster keys in Master-Slave Configuration
Do Read: Configure Cluster manual