What’s SSH session recording / Record SSH Session?
SSH session recording is the process of capturing and storing interactions that occur during Secure Shell (SSH) sessions on servers. This includes recording of both commands entered by users and the corresponding outputs.
The importance of Recording SSH Sessions in an organization or in IT infrastructure.
1. Security and Compliance :- Recording SSH sessions helps in real-time monitoring of user activities, detecting unauthorized actions, malicious commands, or potential security breaches. Realtime monitoring and logging of user’s SSH activities helps in meeting various security compliance with industry regulations (such as PCI-DSS, HIPAA) and internal policies.
2. Accountability :-Recording SSH sessions enables organizations to maintain accountability among users, and reduces the risk of insider threats or accidental errors.
3. Forensic Analysis:- In the event of a security incident or a breach, recorded SSH sessions can be used as a valuable forensic evidence. From the SSH log, we can get the details like exact time when the incident occur, username, commands executed etc.
4. Operational Efficiency :- By monitoring the recorded ssh session data, administrators can identify inefficiencies, bottlenecks, or patterns that may indicate the need for optimization or resource allocation adjustments.
What’s the Purpose of Recording SSH Sessions?
After the covid 19 pandemic, there are a lot of system administrators working from home and using remote software for managing and configuring servers remotely. Most system administrators choose the SSH protocol for remote administration and management of Linux-based servers. In the enterprise environment, a lot of users are working on the same server via SSH. This may lead to internal data leaks or other threats either intentionally or unintentionally. This is where the SSH session recording comes into the picture. Recording SSH sessions for administrators and users have always been a demand for security and knowledge-sharing purposes.
What are the different methods to record SSH sessions?
There are several methods to record SSH sessions in Linux-based distributions. Some of them are listed below:
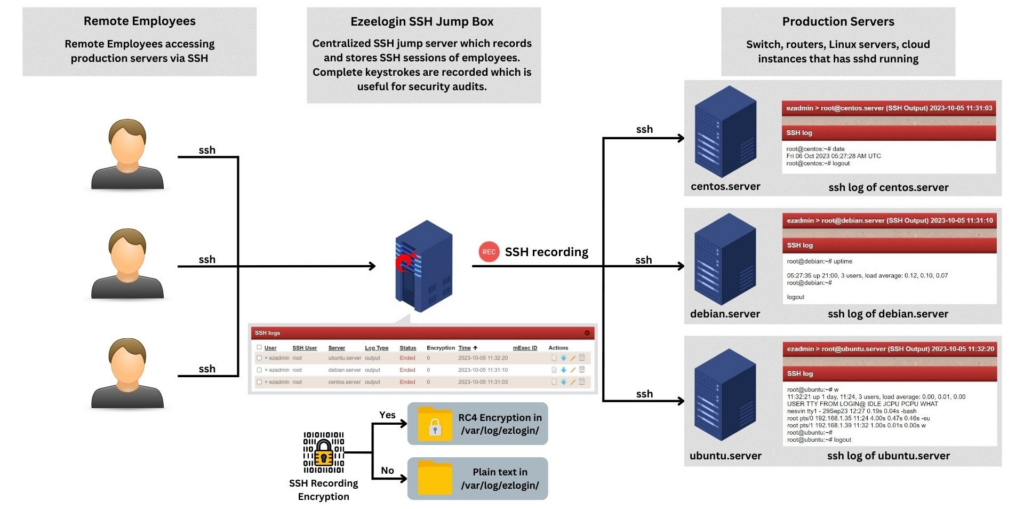
Ezeelogin is a secure SSH Jump server software that allows you to set up your own Jump server on a Linux machine. It provides a simple and user-friendly web interface where you can monitor and see all users’ terminal session activity.
Importance of Ezeelogin Record SSH Session Feature
1. Real-time Monitoring and Live Streaming of SSH Logs
Monitor SSH sessions in real-time to track user activities as they happen. Live streaming capability allows administrators to observe sessions actively, ensuring immediate visibility into system access.
2. Download and Save Data for Audit Purposes Easily download recorded session data in txt format for comprehensive audit and meet various security compliance requirements.
3. Search Logs for Specific Patterns, Users, or Servers
Ezeelogin SSH session recording helps to retrieve specific session logs based on criteria such as user names, server names, or specific patterns of activity.
Records details of file transferred with file name, sizes, and transfer timestamps.
5. Webproxy logs
Logs the activities performed through web proxies, timestamps, track accessed url etc.
6. Shell activity log
Gives the details about the user’s shell activities in detail.
How to record SSH sessions using the bash history command?
The history command is a Linux command-line utility that allows you to track all commands executed by the user in a Linux terminal. It is a very useful tool for system administrators to audit all commands with the date and time executed in the terminal session.
How to configure .bash_history command settings?
By default, all executed commands are stored in the .bash_history file located in each user’s HOME directory. You can also define the number of command stores in the history file. There are two options to configure: HISTFILESIZE – Allows you to define a number of commands kept in the history file HISTSIZE – Allows you to define the number of commands loaded from the memory. You can configure the above options by editing the .bashrc file:
nano ~/.bashrc
Find both the HISTSIZE and HISTFILESIZE parameters and change it with your required values:
					HISTSIZE=10000
HISTFILESIZE=50000
Save and close the .bashrc file.
Also, bash saves all executed commands in the history file at the end of each session and overwrites the existing history file. You can change the default setting by editing the .bashrc file:
nano ~/.bashrc
Add the following line:
shopt -s histappend
Save and close the file.
By default, bash adds all commands to your history file after the end of the session. If you want to add the executed command immediately, edit the .bashrc file:
nano ~/.bashrc
Add the following lines:
export PROMPT_COMMAND="history -a; history -c; history -r; $PROMPT_COMMAND"
Save and close the file then run the following command to apply the changes:
source ~/.bashrc
How to Use the History Command?
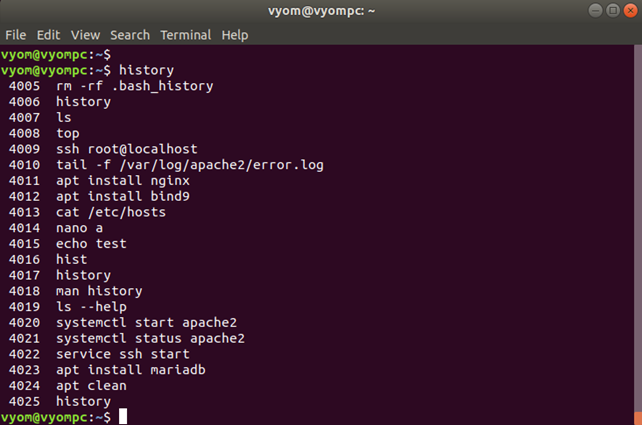
In this section, we will show you how to use the history command to track and see the previously executed command. Let’s run the history command without any argument:
:~$ history
This will show you all previously executed commands saved in the history file:
How to display last 2 executed lines using history command?
To display the last 2 executed commands, run the following command:
:~$ history 2
This command will show you the last two executed commands:
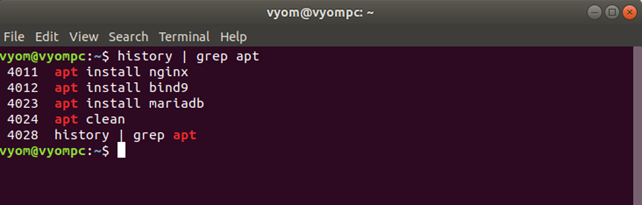
How to search particular command using history?
You can also use the search pattern to filter the specific command from the history file.
:~$ history | grep apt
This command will find commands that match the pattern apt:
How to delete specific command from history command?
If you want to delete the specific command from the history file use the -d option. For example, delete the command number 4011 from the history list, and run the following command:
history -d 4011
How to clear all the history?
To clear all history, run the following command:
history -c
Is it possible to disable recording of particular command using history?
Yes, to disable recording the executed command, run the following command:
set +o history
How to re-enable recording in bash history?
You can also re-enable it with the following command:
set -o history
2. Record SSH Sessions Using the Script Command
The script is a Linux command line utility that allows users to track and record all commands executed in terminal sessions. You can also play the recorded session later via the command line interface.
Steps to Install Script Utility
By default, the Script tool comes pre-installed on all major Linux distributions. You can also install it by yourself if it is not available.
a. How to install script utility on Ubuntu and Debian-based operating systems?
Execute the following command
apt-get install util-linux -y
b. How to install script utility on RHEL, CentOS and Fedora-based operating systems
dnf install util-linux -y
Record SSH Session Using the Script Command
By default, the script command record and saves all executed commands in a file called typescript in your current working directory.
Let’s see how to record SSH Sessions using the script command :
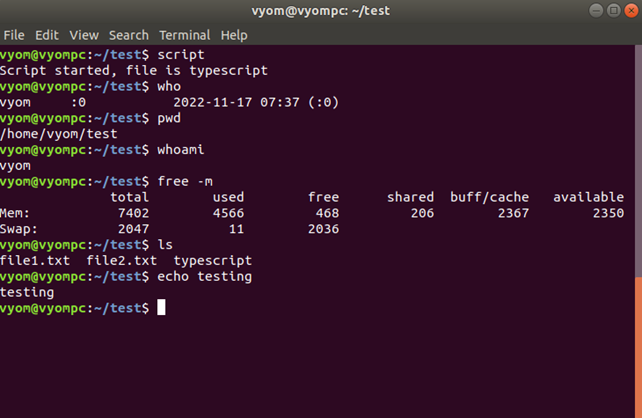
To start recording SSH session just execute the command script.
:~$ script
Script started, file is typescript This will start the recording. Now, let’s run some commands on the terminal
					  :~$ pwd
:~$ who
:~$ whoami
:~$ free -m
:~$ ls
:~$ echo testing
Now, stop the recording and exit from the script session using the following command:
:~$ exit
You should see the following output:
Script done, file is typescript
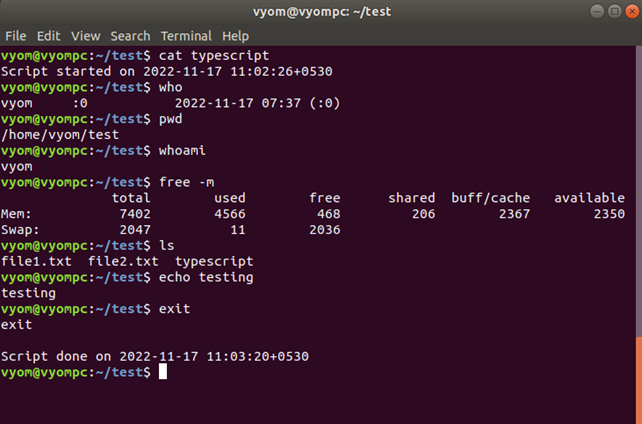
You can now use the cat command to see the content of the typescript file:
cat typescript
You should see all your executed command
Record Session History in Custom File using script command
The script command can record and store session history in a typescript file. You can also define your own file to save the session history. To save the session history in a custom file called session-history.txt, run the following command:
script session-history.txt
You can exit from the script session using the following command:
exit
You can also use the -a option to append the session history to the existing file.
script -a session-history.txt
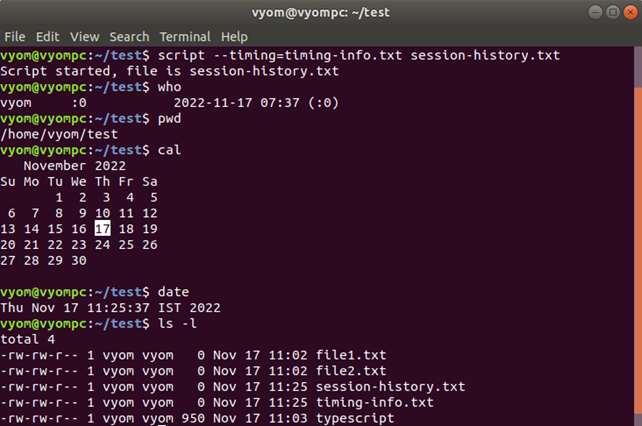
The script command also allows you to record session history with timing information. You can achieve this using the –timing option.
Record Session History with Timing Information
Let’s run the script command and capture the session history with timing information:
You should see the recorded session on the following screen:
3. How to Record SSH Sessions Established via a Jump Server
In this section, we will show you how to record SSH sessions of users accessing remote servers using a self-hosted Jump server and Ezeelogin.
How to record SSH sessions of users accessing remote servers via a SSH jump server?
A Jump server is a central server where all users can access all servers hosted on the private network from a public network. A Jump server can minimize the chance of a potential attack.
In this section, we will show you how to configure the Jump server on a Linux machine. We will then record and track all SSH sessions of users who are accessing the remote server via the Jump server.
First, create a directory to store all recorded log files and give necessary permission:
					mkdir /var/log/jump
chmod -R 777 /var/log/jump
Next, edit the SSH configuration file and modify some default parameters:
nano /etc/ssh/sshd_config
Change the following lines:
					AllowTcpForwarding no
X11Forwarding no
Then, add the following line at the end of the file:
ForceCommand /usr/bin/jump/shell
Save and close the file then create a custom OpenSSH script that runs when any user login to the Jump server via SSH:
					mkdir /usr/bin/jump
nano /usr/bin/jump/shell
Add the following code:
					if [[ -z $SSH_ORIGINAL_COMMAND ]]; then
# The format of log files is /var/log/jump/YYYY-MM-DD_HH-MM-SS_user
LOG_FILE="`date --date="today" "+%Y-%m-%d_%H-%M-%S"`_`whoami`"
LOG_DIR="/var/log/jump/"
# Print a welcome message
echo ""
echo "NOTE: This SSH session will be recorded"
echo "AUDIT KEY: $LOG_FILE"
echo ""
# I suffix the log file name with a random string. I explain why
# later on.
SUFFIX=`mktemp -u _XXXXXXXXXXXXXXXXXXXXXXXXXXXXXXXX`
# Wrap an interactive shell into "script" to record the SSH session
script -qf --timing=$LOG_DIR$LOG_FILE$SUFFIX.time $LOG_DIR$LOG_FILE$SUFFIX.data --command=/bin/bash
else
echo "This jump supports interactive sessions only. Do not supply a command"
exit 1
fi
Save and close the file then give executable permission to the script:
chmod a+x /usr/bin/jump/shell
Next, restart the SSH service to apply the configuration changes:
service sshd restart
Next, create a new user called jumpuser1 for which you want to record all terminal session activities.
adduser jumpuser1
At this point, the Jump server is configured to record and track all users’ activity that is connecting to a remote server via the Jump server.
Next, go to your local machine and log in to your Jump server via SSH.
ssh jumpuser1@jump-server-ip
Once you are logged in, you should see a message saying that your SSH terminal session will be recorded:
Next, log in to the remote server from the Jump server using the following command:
ssh root@remote-server-ip
After the successful login, run the following commands one by one on the terminal:
					pwd
date
uptime
df -h
free -m
ls
whoami
Next, exit from the remote server with the following command:
exit
Your SSH session is now recorded and save the recorded log files in the /var/log/jump/ directory. You can check the generated log files using the following command:
ls -l /var/log/jump/
You should see both files in the following output:
					total 8
-rw-rw-r-- 1 jumpuser1 jumpuser1 2509 Nov 17 09:16 2022-11-17_09-15-05_jumpuser1_GgGSQLnHGRx0wojUjPnsks865ggl4lSS.data
-rw-rw-r-- 1 jumpuser1 jumpuser1 1352 Nov 17 09:16 2022-11-17_09-15-05_jumpuser1_GgGSQLnHGRx0wojUjPnsks865ggl4lSS.time
You can now use the cat command to view the recorded session logs:
You should see all command history that is executed on the remote server in the following screen:
You can also replay the recorded SSH session using the scriptreplay command:
					cd /var/log/jump/
scriptreplay --timing=2022-11-17_09-15-05_jumpuser1_GgGSQLnHGRx0wojUjPnsks865ggl4lSS.time 2022-11-17_09-15-05_jumpuser1_GgGSQLnHGRx0wojUjPnsks865ggl4lSS.data
Comparison Chart Between History , Script and Record SSH Session in Ezeelogin